
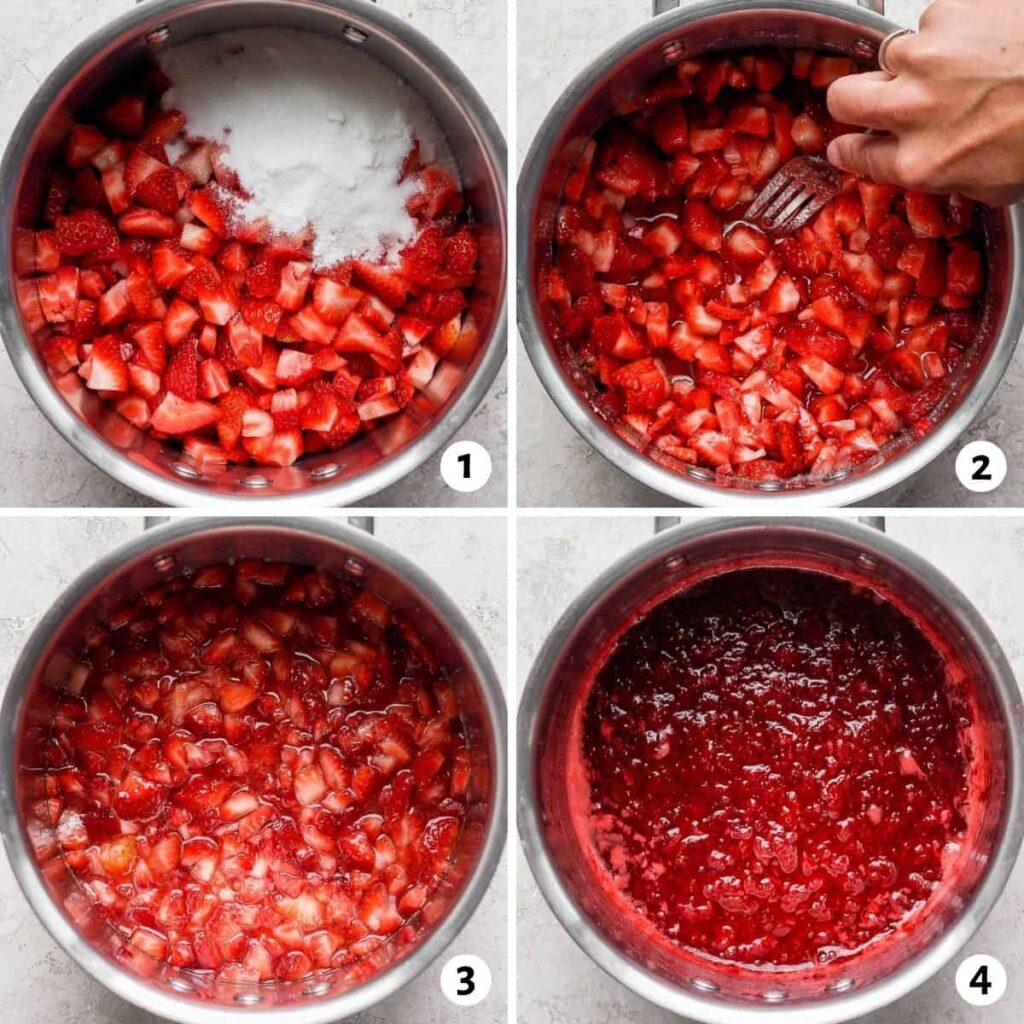
Making jam is a straightforward process that requires no special culinary skills. In fact, it’s a great way to create a more natural and healthier alternative to store-bought jams, which often contain added preservatives and sugars.
To make jam, you’ll need just two ingredients: sugar for preservation and, of course, fruit. But it’s essential to use only healthy fruits that are grown in your own garden or sourced from organic farming practices.
As we dive into the world of making jam, let’s start with the basics. What do you need to get started?
The Basics: Ingredients and Equipment
To make jam, you’ll require two main ingredients:
- Sugar for preservation
- Fresh fruit (preferably seasonal and grown in your own garden or sourced from organic farming practices)
In addition to these ingredients, you’ll also need some basic equipment:
- A large pot with a lid
- A cutting board
- A knife
- A spoon
- Glass jars with tight-fitting lids
Now that we have our ingredients and equipment, let’s move on to the next step: preparing the fruit.
Preparing the Fruit
Before you start making jam, it’s crucial to wash and prepare your fruit thoroughly. Remove any stems, leaves, or pits, as these can affect the texture and flavor of your jam. The skin of the fruit also contains a natural gel-like substance called pectin, which acts as an additive in your jam.
Next, slice the prepared fruit into small pieces and place them in a large pot. Add some water to cover the fruit, but make sure not to overdo it – we want to avoid creating too much liquid during the cooking process.
Cooking the Fruit
Now that our fruit is ready, let’s talk about cooking it. The key here is to use a low heat and cook the fruit for an extended period. This will help break down the natural sugars in the fruit and create a smooth, jam-like consistency.
As a general rule of thumb, aim to cook your fruit with 1 kg of sugar for every 1 kg of fruit. However, if you’re using particularly sweet fruits like peaches or plums, you may want to reduce the amount of sugar accordingly.
Checking for Doneness
So, how do we know when our jam is ready? Here are three simple methods to check:
- Taste Test: Take a small spoonful of your jam and taste it. If it’s still too runny, continue cooking until you reach your desired consistency.
- Acid Test: Add a few drops of vinegar to your jam and observe the reaction. If the mixture fizzes or bubbles, it’s ready to go!
- Set Test: Place a small spoonful of your jam onto a chilled plate or glass surface. If it sets quickly and doesn’t run off the edge, you’re good to go!
The Jam-Making Process
Now that we’ve covered the basics, let’s talk about the actual jam-making process.
- Combine your prepared fruit with water in a large pot.
- Add sugar to taste and stir until dissolved.
- Bring the mixture to a boil over low heat, stirring frequently.
- Reduce heat to a simmer and cook for an extended period (about 20-30 minutes).
- Remove from heat and let cool slightly.
- Use a spoon to test the jam’s consistency and flavor.
Sterilizing Your Jars
Before filling your jars with hot jam, make sure they’re sterilized. To do this:
- Fill a large pot with water and bring it to a boil.
- Carefully add your clean glass jars to the boiling water for 10-15 minutes.
- Remove jars from water and let them cool before filling.
Storage and Shelf Life
Once you’ve filled your sterilized jars with jam, make sure to store them properly:
- Store in a cool, dark place (e.g., pantry or cupboard).
- Keep away from direct sunlight and heat sources.
- Allow 15 days of ripening time for the flavors to mature.
Tips and Tricks
Here are some final tips to keep in mind when making your own jam:
- Use only fresh, seasonal fruit for the best flavor and texture.
- Experiment with different spices and flavorings (e.g., citrus zest, cinnamon, or ginger) to create unique jam recipes.
- Consider using a jam-making guide or recipe book for inspiration.
Frequently Asked Questions
Here are some frequently asked questions about making jam:
Q: What’s the best type of fruit to use for making jam?
A: Choose seasonal and healthy fruits like strawberries, blueberries, raspberries, or peaches.
Q: How long does it take to make a batch of jam?
A: The cooking time will depend on the size of your batch, but expect anywhere from 30 minutes to several hours.
Q: Can I use sugar substitutes instead of regular sugar in my jam recipe?
A: Yes, you can experiment with alternative sweeteners like honey or maple syrup. Just be aware that they may affect the flavor and texture of your jam.
Q: How do I store leftover jam for later consumption?
A: Store sealed jars in a cool, dark place (e.g., pantry or cupboard). Shelf life will depend on storage conditions, but typically lasts up to 12 months.
Q: Can I can my homemade jam using a water bath canner?
A: Yes, you can use a water bath canner for sterilizing and processing your jars. Just follow the manufacturer’s instructions for safety guidelines.
Variations and Creative Ideas
Now that we’ve covered the basics of making jam, let’s talk about some variations and creative ideas to take your jam-making skills to the next level!
- Fruit Combinations: Experiment with different fruit combinations to create unique jam flavors. For example, try pairing strawberries with raspberries or blueberries with blackberries.
- Spice it Up: Add a pinch of spice to give your jam an extra boost of flavor. Try using cinnamon, nutmeg, or ginger for added depth and warmth.
- Citrus Zest: Incorporate citrus zest into your jam recipe for a burst of citrus flavor. Use lemon or orange zest for a classic combination.
- Herbs and Spices: Infuse your jam with herbs like mint or basil for a refreshing twist on traditional flavors.
Common Mistakes to Avoid
Here are some common mistakes to watch out for when making jam:
- Overcooking: Be careful not to overcook your fruit, as this can result in a jam that’s too thick and sticky.
- Undercooking: On the other hand, undercooked jam can be too runny and may require additional cooking time.
- Using Old or Rotten Fruit: Always use fresh and healthy fruits for making jam. Old or rotten fruit can affect the flavor and texture of your jam.
Preserving Jam: Tips and Tricks
Preserving jam is an art that requires attention to detail, patience, and a bit of know-how. Here are some tips and tricks to help you preserve your jam successfully:
- Sterilization: Sterilize your jars and equipment before filling them with hot jam.
- Sealing Jars: Use the correct type of lid or seal for your jar size and type.
- Water Bath Canning: Follow safe water bath canning practices to ensure your jam is properly sterilized and sealed.
Making Jam at Home: Safety Precautions
When making jam at home, it’s essential to follow basic safety precautions to avoid accidents and injuries:
- Wear protective gear: use oven mitts, gloves, and a hat when handling hot equipment.
- Keep children away: ensure children are not present during the jam-making process.
- Follow manufacturer instructions: read and follow the manufacturer’s instructions for any equipment or ingredients you’re using.
Tips for Beginners
If you’re new to making jam, here are some tips to get you started:
- Start with simple recipes: begin with basic fruit combinations like strawberry-rhubarb or apricot-cherry.
- Use fresh ingredients: always use fresh and healthy fruits for the best flavor and texture.
- Be patient: jam-making can be a slow process. Don’t rush it, and enjoy the journey!
Conclusion
Making jam is an easy and rewarding process that allows you to create delicious, natural preserves at home. With these simple steps and tips, you’ll be on your way to becoming a jam-making pro! Remember to always use fresh ingredients, follow basic safety precautions, and experiment with different flavors and recipes to take your jam-making skills to the next level.
Happy jamming!


