
As the world grapples with waste management and environmental sustainability, creating your own compost at home has become an increasingly popular practice. In this article, we’ll explore the benefits of composting, how to get started, and provide a step-by-step guide on making your own compost at home.
The Importance of Composting
Composting is the process of breaking down organic waste into a nutrient-rich soil amendment that can be used in gardening and agriculture. The decomposition process involves microorganisms like bacteria and fungi that feed on organic matter, producing humus, a rich source of nutrients for plants.
However, traditional composting methods often require specialized equipment and space, making it inaccessible to many people. This is where creating your own compost at home comes in – it’s easier, cheaper, and can be done in even the smallest of spaces.
The Benefits of Composting
Composting has numerous benefits for the environment, including:
- Reducing greenhouse gas emissions
- Conserving water
- Reducing waste sent to landfills
- Producing a natural fertilizer
These benefits make composting an attractive option for homeowners looking to reduce their environmental footprint.
The Science Behind Composting
Composting is a complex process that involves the breakdown of organic matter by microorganisms. The decomposition process can be divided into three stages:
- Decomposition: This stage occurs when microorganisms break down the organic matter into smaller particles.
- Humus formation: During this stage, the broken-down organic matter is transformed into humus, a nutrient-rich soil amendment.
- Composting: The final stage involves the maturation of the compost pile, during which the humus is stabilized and ready for use in gardening.
Incineration vs. Decomposition
There are two primary ways to recycle organic waste: incineration and decomposition.
- Incineration: This method involves burning the organic waste to produce energy. However, this process is often inefficient and can lead to air pollution.
- Decomposition: This method involves allowing the organic waste to break down naturally in the environment. This process is slow but efficient and produces a nutrient-rich compost.
Creating Your Own Compost at Home
To create your own compost at home, you’ll need to follow these steps:
Step 1: Choose a Location
Before starting your composting journey, it’s essential to choose a location for your compost pile. Look for a spot that is well-ventilated, accessible, and out of direct sunlight.
- Consider the proximity to your garden or yard
- Ensure that the area is clear of any flammable materials
- Choose a location with good drainage
Step 2: Gather Materials
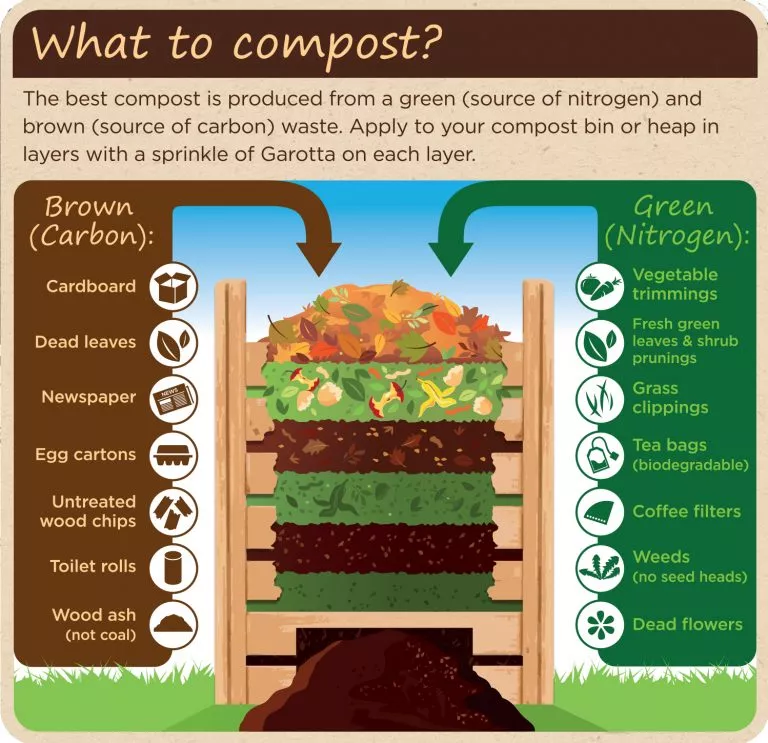
To create your compost, you’ll need to gather materials such as “green” waste (food scraps, grass clippings) and “brown” waste (leaves, twigs). Aim for a mix of 2/3 brown waste and 1/3 green waste.
- Green waste: Food scraps, grass clippings, coffee grounds
- Brown waste: Leaves, twigs, straw
Step 3: Layer the Materials
Start by layering your brown waste at the bottom of the compost pile. Next, add a layer of green waste on top of the brown waste. Repeat this process until you’ve reached the desired height for your compost pile.
- Start with a 4-6 inch layer of brown waste
- Add a 2-3 inch layer of green waste
- Repeat the process until you reach the desired height
Step 4: Add Water and Mix
As you add each new layer, sprinkle some water over the pile to keep it moist. Use a pitchfork or shovel to mix the materials together every few days.
- Aim for a consistency like a damp sponge
- Avoid overwatering, which can lead to anaerobic conditions
Step 5: Monitor Temperature and Moisture
Keep an eye on the temperature of your compost pile and ensure that it’s not too dry or wet. Aim for a temperature range of 130-140°F (54-60°C).
- Use a thermometer to monitor the temperature
- Avoid overmixing, which can lead to anaerobic conditions
Tips and Tricks
Here are some additional tips to help you create your own compost at home:
- Keep your compost pile covered to retain heat and prevent pests.
- Avoid adding meat, dairy, and oils to your compost as they can attract pests and create unpleasant odors.
- Use a pitchfork or shovel to mix the materials together every few days.
Common Composting Challenges
Composting can be challenging, especially for beginners. Here are some common challenges and how to overcome them:
- Odor: If your compost pile is producing an unpleasant odor, it may be due to overwatering or anaerobic conditions.
- Check the moisture level and adjust accordingly
- Use a pitchfork or shovel to mix the materials together
- Pests: If you’re experiencing pest problems in your compost pile, it’s likely due to adding meat, dairy, or oils.
- Avoid adding these materials to your compost pile
- Keep your compost pile covered and well-ventilated
Conclusion
Creating your own compost at home is an easy and eco-friendly way to reduce waste and produce nutrient-rich soil amendments. By following these steps and tips, you’ll be well on your way to becoming a composting pro!
Frequently Asked Questions (FAQs)
Here are some common questions people have about creating their own compost at home:
- What type of materials can I add to my compost pile?
- Green waste (food scraps, grass clippings)
- Brown waste (leaves, twigs)
- How often should I mix the materials together in my compost pile?
- Every few days
- What is the ideal temperature range for my compost pile?
- 130-140°F (54-60°C)
- Can I compost meat, dairy, and oils?
- No, these materials can attract pests and create unpleasant odors.
- How long does it take to complete the composting process?
- 2-6 months



