
Would you like to surprise your loved ones with homemade Easter eggs made of chocolate? Even if you’re not an expert, we’ll guide you through the process of creating delicious and beautifully decorated Easter eggs using chocolate. Not only will they taste amazing, but they’ll also save you money!
Choosing the Right Chocolate
The type of chocolate you choose depends on your personal preference. We recommend a high-quality dark chocolate with a cocoa content above 65% without added sugars. Dark chocolate is not only delicious but also packed with antioxidants and other nutrients that can provide numerous health benefits.
Getting Ready to Make Easter Eggs
To get started, you’ll need some basic equipment:
- A pot
- A chocolate mold in the shape of an Easter egg (preferably made of plastic or silicone)
- Chocolate filling
Preparing the Chocolate Egg Molds
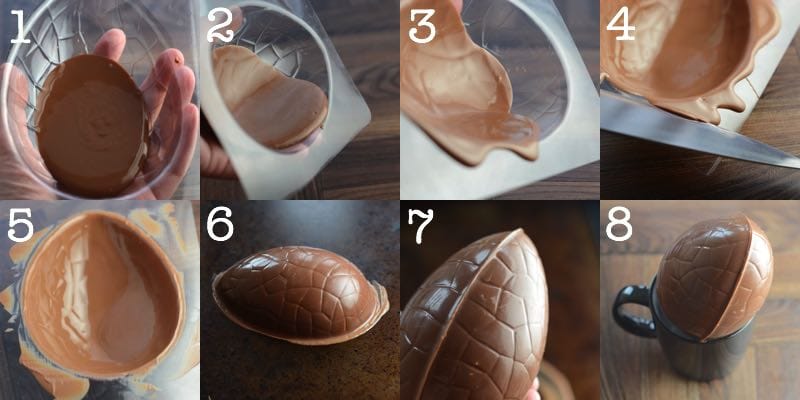
Now that we have our equipment ready, let’s move on to preparing the chocolate. We’ll melt 500 grams of chocolate in a low-temperature flame pot and then pour it into the preheated mold. Make sure to grease the molds with some cooking spray or oil before pouring the melted chocolate to ensure they release easily.
Assembling the Chocolate Eggs
After the chocolate has cooled down, we can start decorating our Easter eggs. To do this, take one half of the egg and drizzle melted chocolate onto it. Then, sprinkle some toasted and chopped nuts (walnuts or almonds work well) on top. Repeat the same process with the other half of the egg.
Adding a Surprise Inside
Now that we have our two halves assembled, it’s time to add a surprise inside. You can use any filling you like: nuts, caramel, coconut flakes, etc. Make sure to place them in the center of one of the egg halves and then bring the other half over to cover it.
Baking the Chocolate
To make the chocolate stick together, we need to bake it lightly. Place both halves on a baking sheet lined with parchment paper and bake at 180°C for about 10-15 minutes. Keep an eye on them so they don’t get too dark!
Finishing Touches
Once our chocolate eggs have cooled down completely, we can decorate them with colorful ribbons and paper. You can also add some personalized messages or names to make them extra special.
Variations: Shape Your Chocolate Eggs
The best part is that you can create any shape you want using the same process. Simply change the mold to match your desired shape! You can also experiment with different decorations like chopped nuts, caramel, or coconut flakes – all vegan-friendly!
Making Chocolate Candies (Candied Nuts)
To make chocolate candies, you’ll need:
- 250 grams of fresh soft cheese
- 3 cups of powdered sugar
- 250 grams of melted chocolate
- A tablespoon and a half of vanilla extract
- Some toasted and chopped nuts
Here’s the recipe:
- Mix the softened cream cheese in a bowl until it becomes smooth.
- Add powdered sugar, mixing well until combined.
- Melt the chocolate and mix it with the vanilla extract.
- Gradually add the melted chocolate to the cheese mixture, stirring continuously.
- Once the mixture has cooled down slightly, use your hands or a spoon to shape small balls of candy (about 1 inch in diameter).
- Roll each ball into chopped nuts.
Tips and Tricks
If you have leftover Easter eggs after the holiday, we recommend checking out our article on “How to Recycle Chocolate Eggs: Fondue, Fudge, Truffles”
By following this simple guide, you can create delicious homemade Easter eggs that will surely delight both kids and adults. Don’t forget to try experimenting with different flavors and decorations to make your chocolate eggs truly unique!
Frequently Asked Questions
- What type of chocolate is best for making Easter eggs?
We recommend a high-quality dark chocolate with at least 65% cocoa content without added sugars. - Can I use other types of moldings instead of the traditional egg shape?
Absolutely! You can create any shape you like using the same process. Just change the molding to match your desired shape! - How long should I let the chocolate eggs chill before serving?
It’s recommended that you allow them to cool completely in the refrigerator for at least 2 hours. - Can I make Easter eggs with other fillings besides nuts?
Yes! You can use any filling you like: caramel, coconut flakes, or even candy pieces! - How long will my chocolate eggs last?
If stored properly in an airtight container at room temperature, your chocolate eggs will last for about 2 weeks. - Can I make Easter eggs with vegan-friendly ingredients?
Absolutely! You can experiment with different vegan-friendly fillings and decorations like chopped nuts, caramel, or coconut flakes. - How do I store leftover Easter eggs to keep them fresh longer?
Store them in an airtight container at room temperature for up to 2 weeks.
Additional Easter Egg Decorating Ideas
If you’re looking for more ways to decorate your chocolate eggs, here are some additional ideas:
- Use edible markers or food coloring to draw colorful designs and patterns on the eggs.
- Add some festive sprinkles or nonpareils to give them a fun touch.
- Create a collage of images using small pieces of chocolate or candy.
- Make a chocolate Easter egg tree by stacking multiple eggs together.
Making Chocolate Bunnies for Easter
If you want to make an extra special Easter treat, why not try making some chocolate bunnies? You’ll need:
- 250 grams of dark chocolate
- A bunny-shaped mold (you can use a small plastic cup or a silicone bunny mold)
- Some chopped nuts or candy pieces for decoration
Here’s the recipe:
- Melt the chocolate in a low-temperature flame pot.
- Pour the melted chocolate into the preheated bunny mold.
- Allow the chocolate to cool down completely before removing it from the mold.
- Decorate the bunnies with chopped nuts or candy pieces.
Conclusion
Making Easter eggs at home is a fun and delicious experience that can be enjoyed by people of all ages. With this guide, you’ll learn how to create beautiful and tasty chocolate eggs using just a few simple ingredients. Don’t forget to try experimenting with different flavors and decorations to make your chocolate eggs truly unique!
We hope you had a great time reading this article about making Easter eggs at home. Happy crafting!


