
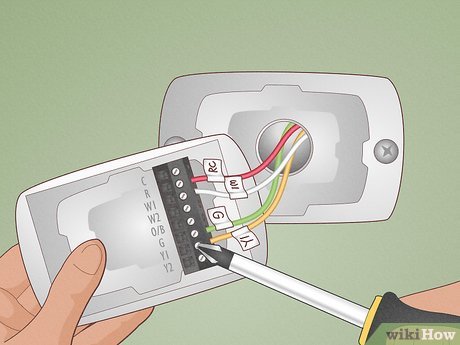
Installing a programmable thermostat is a straightforward process that can be completed with the right tools and materials. In this article, we will guide you through the steps of installing a programmable thermostat in your home, explaining how it works and what you need to do to ensure a safe and successful installation.
What is a Programmable Thermostat?
A programmable thermostat is a device that allows you to regulate the temperature in your home not only based on your needs but also according to a schedule or pre-set intervals. This type of thermostat can be programmed to turn the heating system on and off at specific times, saving energy and reducing your utility bills.
Benefits of Installing a Programmable Thermostat
Installing a programmable thermostat offers several benefits, including:
- Energy Savings: By adjusting the temperature based on your schedule and location, you can save money on your energy bills.
- Increased Comfort: A programmable thermostat allows you to maintain a consistent temperature in your home, regardless of when you’re there or not.
- Improved Air Quality: By regulating the temperature, you can reduce moisture buildup and prevent mold growth, which can improve indoor air quality.
- Extended Equipment Life: Programmable thermostats help prevent overuse of heating systems, leading to extended equipment life.
Installing a Programmable Thermostat: The Process
Installing a programmable thermostat involves several steps that we will outline below:
Gather the Necessary Materials
Before you start installing your programmable thermostat, make sure you have all the necessary materials:
- A programmable thermostat
- Tassels and screws (fisher)
- Cables for connecting
- Electrical connector
- Screwdriver
- Drill
- Wall anchors (optional)
Choosing the Right Location
When selecting a location for your programmable thermostat, consider the following factors:
- Accessibility: Choose a location that is easy to reach and access.
- Ventilation: Ensure good ventilation around the thermostat to prevent overheating or moisture buildup.
- Safety: Install the thermostat at least 150 cm from windows and other heat sources.
Mounting the Thermostat
Once you have chosen the right location, follow these steps:
- Mount the back plate of the thermometer on the wall using screws.
- Connect the cables to the electrical connector.
- Install the receiver, which connects to the boiler.
- Connect the cable from the thermostat to the receiver.
Connecting to the Boiler
To connect your programmable thermostat to your boiler:
- Locate the heating system and identify the boiler.
- Identify the connection point for the electrical connector on the boiler.
- Connect the cable from the thermostat to the boiler.
- Ensure that all connections are secure and meet safety standards.
Programming Your Thermostat
Once you have connected your programmable thermostat to the boiler, follow these steps:
- Install batteries in the thermometer, ensuring a secure connection.
- Turn on the receiver and activate the system.
- Follow the manufacturer’s instructions to set up your thermostat, including programming schedules and settings.
Tips and Considerations
- Always read the manual carefully before installing your programmable thermostat.
- Ensure that all connections are secure and meet safety standards.
- Regularly clean the thermometer and receiver to maintain proper function.
- Use wall anchors if necessary to ensure a level installation.
- Consult a professional if you’re unsure about any aspect of the installation process.
Frequently Asked Questions
Here are some frequently asked questions about installing a programmable thermostat:
- What is the most common location for installing a thermometer?
The most common locations for installing a thermometer include near the furnace, on the wall, or in a corner. - Can I install my own thermometer without professional help?
While it’s possible to install your own thermometer, we recommend consulting a professional if you’re unsure about any aspect of the installation process. - How do I know when my thermometer is working properly?
Your thermometer should be working properly when the temperature is stable and within the set range.
By following these steps and tips, you can successfully install a programmable thermostat in your home. This will not only save energy but also provide you with greater control over the temperature in your home.
Common Issues During Installation
While installing a programmable thermostat is generally a straightforward process, there may be some common issues that arise during installation:
- Incorrect Connection: If the connections are not secure or meet safety standards, it can lead to reduced efficiency and even equipment failure.
- Inadequate Ventilation: Insufficient ventilation around the thermostat can cause overheating and reduce its lifespan.
Preventing Common Issues
To prevent common issues during installation:
- Follow the manufacturer’s instructions carefully.
- Ensure all connections are secure and meet safety standards.
- Regularly clean the thermometer and receiver to maintain proper function.
By taking these precautions, you can ensure a safe and successful installation of your programmable thermostat.
Conclusion
Installing a programmable thermostat is a simple process that requires some basic tools and materials. By following these steps and tips, you can save energy, improve air quality, and increase comfort in your home. Remember to always follow safety guidelines and consult a professional if needed. With the right knowledge and preparation, you can successfully install a programmable thermostat and enjoy its many benefits.


