
Introduction
When it comes to installing a garden lamp, there are several options available, each with its own set of advantages and disadvantages. In this article, we will explore the process of installing a garden lamp, including both electric and solar-powered options.
Choosing the Right Option
The most straightforward way to install a garden lamp is by using solar-powered lamps. These lamps do not require any connection to the mains electricity supply and can be self-sufficient as long as they have a suitable surface area for sunlight absorption. However, if you don’t have a suitable surface area or prefer to use electric lights, you will need to prepare the necessary electrical connections.
Preparing the Site
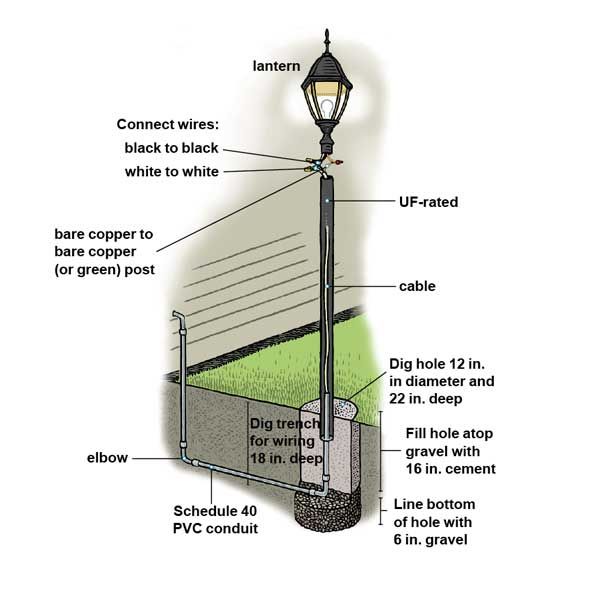
Before starting the installation process, it is essential to prepare the site where you want to install the garden lamp. This includes digging a hole for the power supply and connecting the relevant cables. The cable should be buried underground using a corrugated sleeve to protect it from damage.
Step 1: Prepare the Power Supply
To install a garden lamp, you will need to prepare the power supply by laying down a trench and burying the cable. The trench should be at least as deep as the depth of the cable and should be laid out in a way that minimizes the risk of damage to underground services.
Step 2: Dig the Hole
Once the trench is prepared, you can start digging the hole for the power supply. The hole should be large enough to accommodate the cable and any other necessary fittings. It’s essential to use a level to ensure that the hole is perfectly straight and even.
Step 3: Lay the Cable
With the hole dug, you can now lay the cable. Use a non-invasive trenching method to minimize damage to underground services. Ensure that the cable is securely buried in the trench using a corrugated sleeve to protect it from damage.
Step 4: Install the Lamp Post
Once the power supply is connected, you can install the lamp post. Use a sturdy base and ensure that it is securely anchored to the ground to prevent it from toppling over.
Step 5: Connect the Power Supply
Finally, connect the power supply to the lamp post. This should be done by attaching the power supply cable to the lamp post using a suitable connector. Ensure that all connections are secure and meet the relevant safety standards.
Alternative Solution: Solar-Powered Garden Lamps
One of the best solutions for installing garden lamps is to use solar-powered lights. These lights do not require any connection to the mains electricity supply and can be self-sufficient as long as they have a suitable surface area for sunlight absorption.
Advantages of Solar-Powered Garden Lamps
- Low Maintenance: Solar-powered garden lamps are easy to maintain, requiring only occasional cleaning and checking of the solar panel.
- Environmentally Friendly: These lights do not emit any emissions or contribute to greenhouse gas production, making them a more environmentally friendly option.
- Cost-Effective: While initially more expensive than electric lights, solar-powered garden lamps can save you money in the long run by reducing your electricity bills.
Tips for Installing Solar-Powered Garden Lamps
- Choose a Suitable Location: Ensure that the lamp is placed in an area with sufficient sunlight to charge the battery.
- Check the Weather Forecast: Avoid placing the lamp in areas where it may be exposed to heavy rainfall or direct sunlight, which can cause damage.
Conclusion
Installing a garden lamp can seem like a daunting task, but with the right guidance and preparation, it can be achieved easily. Whether you choose an electric or solar-powered option, ensure that all connections are secure and meet the relevant safety standards.
Frequently Asked Questions
- What is the best way to install a garden lamp?
Solar-powered lamps are often considered the most straightforward option. - Do I need to hire a professional for electrical work?
If you’re not comfortable with electrical connections, it’s highly recommended to hire a licensed electrician. - Can I use a solar-powered lamp in areas with low sunlight?
Solar-powered lamps typically require at least 4-6 hours of direct sunlight per day to function effectively.
Troubleshooting Common Issues
- Lamp not turning on: Check the battery, ensure it’s fully charged, and try replacing the batteries if necessary.
- Flickering light: Check for loose connections or damaged wiring. If you’re still experiencing issues, consider consulting a professional electrician.
Safety Precautions
When installing a garden lamp, it’s essential to follow safety guidelines to avoid electrical shock or injury.
- Use a grounded cable: Ensure that the cable is securely connected to a grounding point on your home’s electrical panel.
- Avoid overloading: Avoid overloading your circuit with too many lamps or heavy appliances.
- Follow manufacturer instructions: Always refer to the manufacturer’s instructions for specific installation and usage guidelines.
Additional Tips
- Test before using: Before installing the lamp, test it to ensure that it functions correctly.
- Consider energy efficiency: Choose a lamp that is energy-efficient and has a low wattage rating to minimize your electricity bills.
- Add some ambiance: Consider adding some ambient lighting around your garden or patio area for added visual appeal.
Conclusion
Installing a garden lamp can seem like a daunting task, but with the right guidance and preparation, it can be achieved easily. Whether you choose an electric or solar-powered option, ensure that all connections are secure and meet the relevant safety standards.


