
If you’re looking for a way to achieve smooth skin without breaking the bank, making your own wax at home might be just what you need. With simple ingredients like lemon, sugar, and honey, you can create your own wax that’s gentle on your skin while still providing a satisfying experience.
Don’t worry if you’ve never attempted DIY waxing before – it’s not as daunting as it sounds! In this article, we’ll break down the process into easy-to-follow steps, so you can achieve salon-quality results from the comfort of your own home.
What You Need to Do Wax at Home
Before we dive into the nitty-gritty, let’s take a look at what you’ll need to get started. Here are the essential tools and materials:
- A spatula for spreading
- A warmer or burner (we’ll discuss these options in more detail later)
- Liposoluble wax in a bottle or roll
- Strips for epilation in soft, non-woven material
Choosing Your Warmer: Roll-On or Burner?
When it comes to choosing your warmer, there are two main options: a roll-on warmer and a burner. Both have their pros and cons, so let’s weigh the advantages and disadvantages of each:
- Roll-On Warmer:
- Pros: practical for areas like legs, arms, and armpits; allows for temperature regulation
- Cons: more difficult to use on sensitive areas; may require some practice to master
- Burner:
- Pros: classic and reliable; can be used on longer hair; suitable for most skin types
- Cons: may take up more time; requires more effort to control the heat
Ultimately, the choice between a roll-on warmer and a burner comes down to personal preference. If you’re new to waxing, we recommend starting with a burners – they’re generally easier to use and provide more consistent results.
Wax Without a Warmer: The Microwave Method
While warmers make waxing faster and easier, there’s no need to break the bank if you don’t have one. If you do have a microwave oven, you can transfer your wax to a silicone container or food-safe bowl and heat it up in short increments until it reaches the desired temperature.
Alternatively, you can use a stovetop to warm your wax – simply place the bottle in a pot of simmering water, stirring occasionally, until the wax reaches the desired consistency.
Benefits of Making Your Own Wax at Home
Making your own wax at home has several benefits. Here are some of the most significant advantages:
- Cost-effective: By making your own wax, you can save money compared to buying commercial products.
- Customization: You can adjust the ingredients and recipe to suit your skin type and preferences.
- Control: With DIY waxing, you have complete control over the temperature and consistency of the wax.
Ingredients for Your Homemade Wax
Here are some common ingredients used in homemade wax:
- Liposoluble wax (such as carnauba or beeswax)
- Lemon juice
- Sugar
- Honey
- Essential oils (optional)
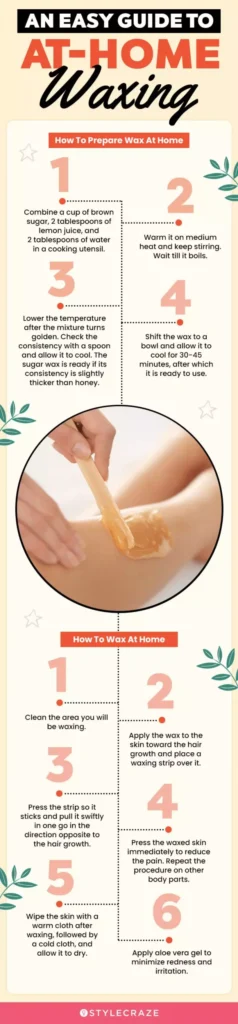
You can adjust the proportions of each ingredient to suit your needs and skin type. Here’s a basic recipe for a gentle, sugar-based wax:
Ingredients:
- 1 cup granulated sugar
- 1/2 cup lemon juice
- 1 tablespoon honey
- 1 teaspoon liposoluble wax (such as carnauba or beeswax)
How to Do Wax at Home: A Step-by-Step Guide
Now that we’ve covered the basics, let’s move on to the fun part – actually doing the waxing! Here’s a step-by-step guide to help you achieve salon-quality results:
- Prepare your skin: Make sure your skin is dry, clean, and hydrated before starting the process.
- Apply a thin layer of wax: Using a spatula or roll-on warmer, apply a thin layer of wax to the area you’re about to wax. The skin should be taut, but not too tight.
- Apply the strip: Following the direction of hair growth, hold the skin taut and apply an even layer of wax to the strip. Press gently with your hand to help it stick.
- Pull the strip: Grab the strip at one end and pull in the opposite direction of hair growth. This is the most difficult part – but don’t worry, it’s worth it!
- Repeat as needed: If you need to remove more hair from the same area, repeat the process.
Aftercare: Hydrating Your Skin
After waxing, it’s essential to hydrate your skin to prevent dryness and irritation. Apply a gentle oil or cream, such as honey oil, to keep your skin soft and supple.
Tips for Smooth Waxing
Here are some additional tips to help you achieve smooth, silky skin:
- Exfoliate regularly: Use a gentle exfoliant or sugar scrub to remove dead skin cells and prevent ingrown hairs.
- Moisturize daily: Apply a rich moisturizer after waxing to keep your skin hydrated and soft.
- Avoid sensitive areas: If you have sensitive skin, avoid waxing on areas like the bikini line or underarms.
Frequently Asked Questions
Here are some common questions we’ve received about DIY waxing:
Q: Can I use any type of wax for waxing?
A: No – liposoluble wax is the best choice for waxing. Other types of wax may not be suitable for the skin or may cause irritation.
Q: How often should I wax at home?
A: It’s generally recommended to wax every 3-4 weeks, depending on your hair growth rate and personal preference.
Q: Can I use wax strips on sensitive areas?
A: No – wax strips can be too harsh on sensitive areas. Instead, opt for a gentle exfoliant or sugar scrub.
Q: How do I store my wax and warmers?
A: Store your wax in a cool, dry place, away from direct sunlight. Warmers should be stored in a well-ventilated area to prevent overheating.
Q: Can I use DIY wax on hard-to-reach areas?
A: Yes – with some patience and practice, you can use DIY wax on hard-to-reach areas like the bikini line or underarms.
Q: How do I remove wax residue from my skin?
A: Gently massage a small amount of oil or cream into the affected area to help remove any remaining wax residue.
Conclusion
Making your own wax at home is a simple and effective way to achieve smooth, silky skin. With just a few ingredients and some basic tools, you can create your own wax that’s tailored to your needs and skin type. Remember to follow proper safety precautions and take care of your skin after waxing for the best results. Happy waxing!


