
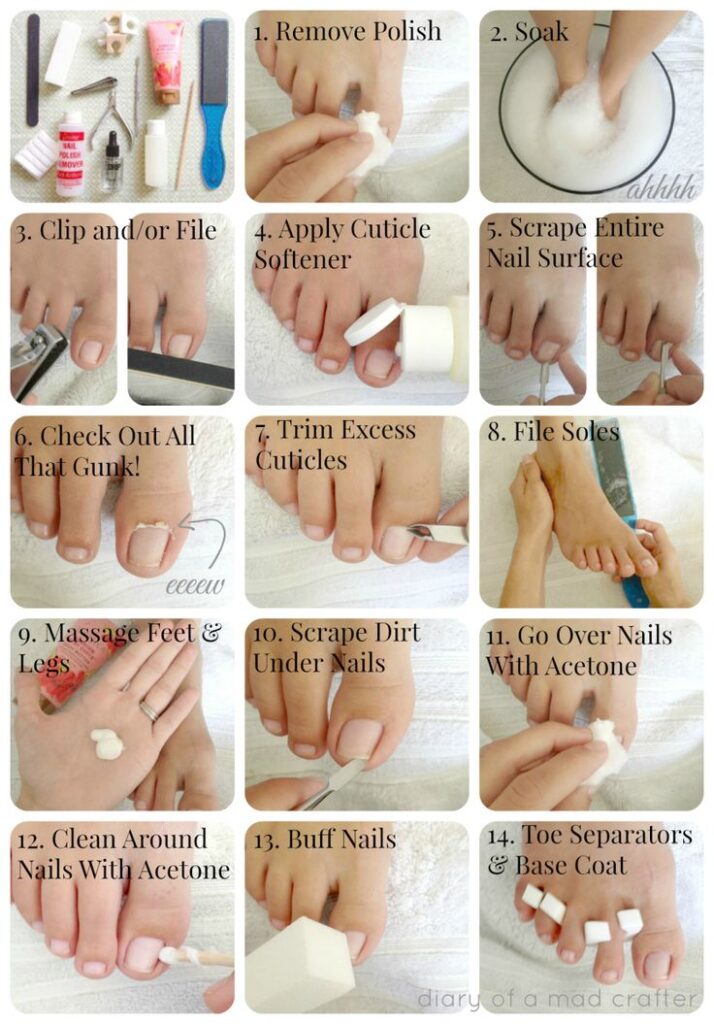
As a woman, it’s common to search online for information on DIY pedicures. However, many women hesitate to try one themselves, believing that it’s too difficult. The good news is that this couldn’t be further from the truth. With some attention and awareness, you can learn to give yourself a pedicure at home that will leave your feet looking and feeling amazing!
Preparation is Key
Before we dive into the process, let’s talk about preparation. Removing old nail polish is the first step in any DIY pedicure. To do this, soak a cotton ball in a nail polish remover (choose a gentle formula without acetone) and place it on each toenail for a few seconds to allow the polish to dissolve. Don’t skip this step, as leaving old polish behind can lead to uneven results.
Tip: If you notice any remaining small stains or discoloration after removing the polish, gently scrub them away with a cotton swab.
Removing old nail polish may seem like a simple task, but it’s essential to do it correctly. Acetone-based removers can dry out your nails and cuticles, so choose a gentle formula that won’t damage your skin or nails. If you’re using a remover that contains acetone, apply a moisturizer after the process to hydrate your nails and cuticles.
Immersion
Soaking your feet and toes is a crucial part of the pedicure process. This helps soften hardened skin and cuticles. You can do this in a sink, bathtub, or even a foot bath. Choose the option that works best for you!
For immersion, fill a container with warm water and add some relaxing salts to soothe your skin. Leave your feet in for a few minutes before moving on to the next step.
The benefits of soaking are numerous. Not only does it soften hardened skin, but it also helps reduce swelling and inflammation in the feet. If you have plantar fasciitis or other foot pain issues, soaking can help alleviate discomfort and promote healing.
Cuticle Care
Now it’s time to focus on cuticle care. Using nail clippers, carefully trim and shape your toenails. Then, use a nail file to gently buff and smooth out any rough edges.
If you have particularly stubborn cuticles or hangnails, consider using a pumice stone or foot file to gently exfoliate the area. Be sure to change feet and repeat the process to avoid missing any spots!
When it comes to trimming toenails, there’s no one-size-fits-all approach. The key is to find the right balance between neatness and practicality. If you have very long toenails, consider using a nail clipper with a curved blade to help shape them into a more manageable shape.
Massage Time!
After soaking and trimming, it’s time for some serious relaxation. Using a rich hand cream or body lotion, massage your toes, feet, and ankles in circular motions until you feel your tension melt away.
Don’t forget to focus on those cuticles – use a gentle, soft-bristled brush to push them back gently, being careful not to scrub too hard. This will help keep your nails healthy and prevent infection.
Massage is an essential part of the pedicure process, as it helps stimulate blood flow and relax tense muscles. Take your time and be gentle – you want to enjoy this experience, not feel any discomfort or pain.
Cleaning Up
Once you’ve finished massaging, take a cotton ball soaked in alcohol to wipe down each toenail, removing any excess cream or residue that might interfere with the polish adhering properly.
Now it’s time for the final touch: applying nail polish! If you’re using nail separators, use them to separate your toes before painting. Otherwise, use paper towels to gently lift and paint around each toe.
Apply a thin layer of base coat, followed by two coats of your favorite color (leave the middle one to dry between coats). Finish off with a topcoat to seal everything in place!
Tips for a Salon-Quality Pedicure
To achieve salon-quality results at home, keep the following tips in mind:
- Use high-quality nail polish and remove old polish carefully
- Soak your feet thoroughly to soften skin and cuticles
- Trim toenails carefully and shape them into a neat, even shape
- Massage your toes, feet, and ankles gently to stimulate blood flow
- Apply a thin layer of base coat, followed by two coats of polish, and finish with a topcoat
By following these tips and techniques, you can create a salon-quality pedicure at home that will leave your feet looking and feeling amazing.
Frequently Asked Questions
Q: What type of nail polish remover should I use for a DIY pedicure?
A: Choose a gentle formula without acetone to avoid drying out your nails.
Q: How long should I soak my feet in warm water?
A: Aim for at least 5-10 minutes to allow the skin to soften and relax.
Q: What’s the best way to trim toenails for a DIY pedicure?
A: Use nail clippers specifically designed for trimming toenails, taking care not to cut too short or unevenly.
Q: Can I use a pumice stone on my cuticles?
A: Be gentle and only use it if absolutely necessary – rough exfoliating can cause irritation and damage.
Q: How often should I do a DIY pedicure?
A: Every 2-3 weeks is ideal for maintaining healthy, strong-looking nails.
Q: What’s the most important step in a DIY pedicure?
A: Prep work! Removing old polish, soaking, and cleaning are all crucial to achieving great results.
Common Mistakes to Avoid
To ensure that your DIY pedicure turns out beautifully, be aware of these common mistakes:
- Not removing old polish properly – this can lead to uneven results
- Not soaking long enough – this can cause skin irritation or discomfort
- Cutting toenails too short or unevenly – this can lead to ingrown nails or other issues
- Using a pumice stone on cuticles – rough exfoliating can cause irritation and damage
By being aware of these common mistakes, you can take steps to avoid them and achieve salon-quality results at home.
The Benefits of DIY Pedicures
While many women may be hesitant to try a DIY pedicure, the benefits are numerous. Not only does it save money on salon visits, but it also allows you to relax and pamper yourself in the comfort of your own home.
By doing your own pedicures at home, you can:
- Save money on salon visits
- Relax and unwind in a peaceful environment
- Achieve salon-quality results without breaking the bank
- Take control of your nail health and maintenance
Overall, DIY pedicures are a great way to take care of yourself and achieve beautiful, healthy-looking feet. With practice and patience, you can master the techniques and tips outlined in this guide to create stunning pedicures that will leave you feeling confident and pampered.
Conclusion
We hope this guide has given you some valuable tips for creating a salon-quality pedicure at home. Remember, practice makes perfect – so don’t be discouraged if it takes a few tries to get the hang of it! Start small, take your time, and soon you’ll be enjoying beautiful, healthy-looking feet like a pro!
By following these steps and tips, you can create a DIY pedicure that will leave you feeling relaxed, refreshed, and ready to take on the day. So why not give it a try? Your feet will thank you!


