
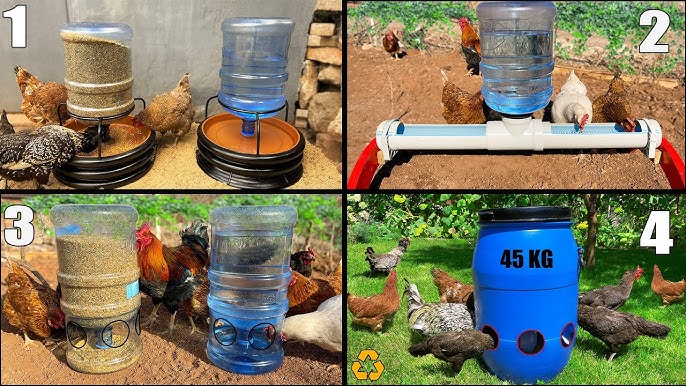
Understanding the Importance of a Proper Chicken Waterer
As any chicken owner knows, providing fresh water for their birds is essential for their health and well-being. However, finding a reliable and affordable way to ensure access to clean drinking water can be a challenge. In this article, we’ll explore the benefits and drawbacks of building a DIY chicken waterer and provide guidance on how to create one using simple materials.
The Pros and Cons of a DIY Chicken Waterer
Before diving into the nitty-gritty of building your own chicken waterer, let’s weigh the pros and cons. The advantages are clear: by making your own waterer, you can save money on commercial products and reduce waste. However, there are also some potential downsides to consider.
- One major drawback is that DIY waterers can be difficult to clean and maintain, which can lead to bacterial growth and contamination.
- If not designed properly, DIY waterers may also pose a risk of flooding or overflow.
- Additionally, the aesthetic appeal of a DIY waterer may vary from store-bought options, and some owners might find them less attractive than their commercial counterparts.
Alternatives to a DIY Chicken Waterer
If you’re not comfortable building your own waterer from scratch, there are other options available. For example, you can consider investing in an automatic chicken waterer like the Spagna model. These devices typically feature a built-in reservoir and tubing system that ensures a steady supply of clean water for your birds.
- One advantage of these automated systems is that they require minimal maintenance, as the waterer does all the work.
- However, they can be more expensive than DIY options, especially if you factor in the cost of materials and installation.
- Another option is to use a solar-powered chicken waterer. These devices harness the power of the sun to keep your birds’ water clean and fresh, which reduces the need for electricity.
How to Build a Simple DIY Chicken Waterer
If you’re still interested in building your own chicken waterer, it’s easier than you think! Here are the basic materials you’ll need:
- A large container or bucket with an opening (such as a sump pump or a storage bin)
- A smaller container or bottle with a narrow neck
- Tubing or piping to connect the two containers
Step-by-Step Instructions
- Choose Your Containers: Select two containers that fit your needs. The larger one should have enough capacity to hold at least 2 gallons of water.
- Clean and Prepare the Containers: Wash both containers thoroughly with soap and water before using them.
- Connect the Tubing: Use tubing or piping to connect the two containers. Make sure it’s securely attached and won’t leak.
Tips for a Successful DIY Chicken Waterer
- Place the Waterer in a Safe Location: Position the waterer in an area where your chickens can easily access it without getting into any trouble.
- Clean Regularly: Clean out the waterer daily to prevent bacterial growth.
- Monitor Water Levels: Keep an eye on the water level and refill as needed.
Common Questions and Answers
Q: How often should I clean my DIY chicken waterer?
A: Daily cleaning is essential for maintaining a healthy and safe environment for your chickens. Failure to do so can lead to bacterial growth, which can be harmful to your birds’ health.
Q: Can I use plastic bottles to make my own chicken waterer?
A: Yes, but make sure the bottle has a narrow neck to prevent splashing and messes. You should also consider using food-grade materials for both containers to ensure they are safe for your chickens to consume.
Q: Are there any health risks associated with building a DIY chicken waterer?
A: As long as you follow proper sanitation and cleaning procedures, there should be no significant health risks involved. However, the risk of contamination does exist if not all precautions are taken.
Additional Considerations
- Climate Factors: Be aware that different climates may require additional features to ensure a steady supply of clean water. For example, areas with high temperatures or humidity might need a more efficient cooling system.
- Predator Protection: Make sure your DIY waterer is secure and protected from predators like raccoons, foxes, or other animals that might try to access the water source.
- Maintenance Schedule: Create a schedule for regularly inspecting and maintaining your DIY waterer to prevent any issues and ensure it remains safe and functional.
Conclusion
Building a simple DIY chicken waterer is a great way to save money and reduce waste while still providing a reliable source of clean drinking water for your birds. By following the step-by-step instructions outlined in this article, you can create a functional and safe waterer that meets your needs and those of your feathered friends. Just remember to regularly clean, maintain, and monitor your DIY waterer to prevent any issues and ensure the health and well-being of your chickens.
DIY Chicken Waterer Maintenance
Regular maintenance is key to ensuring the longevity and effectiveness of your DIY chicken waterer. Here are some tips for maintaining your waterer:
- Daily Cleaning: Clean out the waterer daily to remove any debris, sediment, or bacteria that may have accumulated.
- Weekly Disinfection: Disinfect the waterer weekly using a solution of equal parts water and white vinegar.
- Monthly Inspection: Inspect the waterer monthly for any signs of damage, wear and tear, or other issues.
By following these maintenance tips, you can help extend the life of your DIY chicken waterer and ensure it remains a reliable source of clean drinking water for your birds.


