
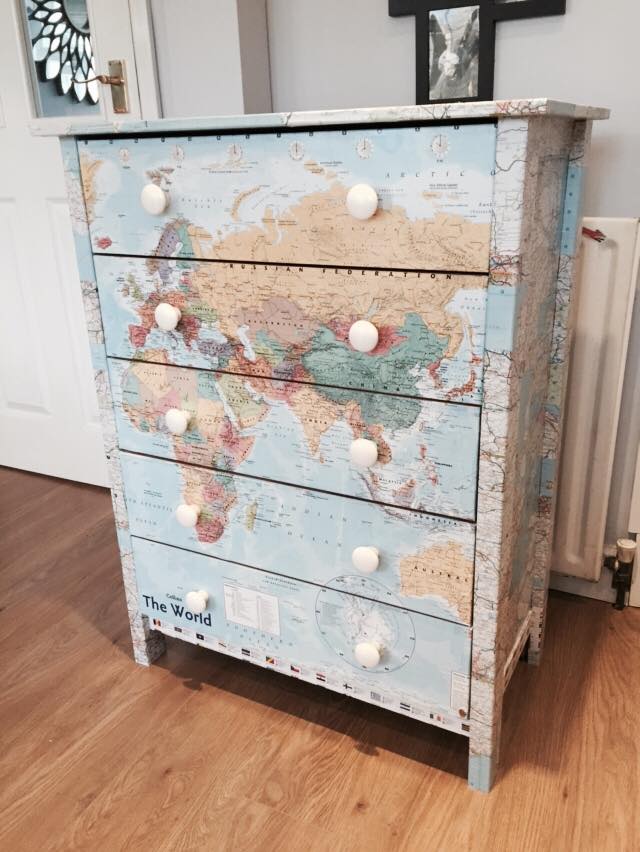
Are you tired of living with outdated furniture? Do you want to give new life to your vintage pieces without breaking the bank? Look no further than decoupage! This ancient art form involves applying cut-out images to a surface, creating a unique and eye-catching design. In this article, we’ll explore the world of decoupage on furniture, covering everything from preparation to application.
What is Decoupage?
Decoupage is an art form that originated in France in the 17th century. It involves applying cut-out images to a surface using a adhesive medium, such as glue or varnish. The term “decoupage” comes from the French word “découper,” meaning “to cut out.” Decoupage can be used on a variety of surfaces, including furniture, paper, and fabric.
Preparing Your Furniture for Decoupage
Before you start decoupaging your furniture, it’s essential to prepare the surface. This involves inspecting the wood for any damage, such as rot or insect infestation. You’ll also need to clean the surface thoroughly, removing any dirt, dust, or old finishes.
Restoring damaged wood is a relatively simple process. If you find any cracks or crevices, you can fill them in with a simple patching compound. However, if the damage is extensive, you may need to replace the entire piece of wood.
Choosing Your Decoupage Supplies
Decoupage requires just a few basic supplies:
- Stencils for tracing your designs
- A variety of adhesives (such as decoupage medium or varnish)
- Scissors or a craft knife
- Cut-out images (printed on paper or fabric)
- Paint (optional)
For beginners, it’s best to start with simple stencils and cut-out images. You can find these online or at local craft stores.
Tips for Cutting Out Your Decoupage Images
When cutting out your decoupage images, make sure to use sharp scissors or a craft knife. This will help you achieve crisp, clean cuts that won’t fray or distort over time.
One helpful tip is to use a ruler or other straightedge to guide your cut-outs. You can also experiment with different techniques, such as layering multiple images on top of each other for added texture and interest.
Applying Your Decoupage Images
Once you’ve cut out your decoupage images, it’s time to apply them to the surface. Here are some general steps to follow:
- Apply a thin layer of adhesive medium or varnish to the surface
- Position the decoupage image on top of the adhesive, smoothing out any air bubbles with your fingers
- Allow the adhesive to dry completely before adding additional layers
Adding Additional Layers and Finishing Touches
Once you’ve applied your first layer of decoupage, you can add additional layers using the same process. Just be sure to allow each layer to dry completely before adding more.
For a professional finish, consider adding additional layers of paint or varnish. This will help protect your decoupage from wear and tear while also enhancing its appearance.
Common Mistakes to Avoid
When working with decoupage, there are a few common mistakes to avoid:
- Using too much adhesive: this can result in a soggy, uneven finish
- Not allowing the adhesive to dry completely: this can cause bubbles or other imperfections
By following these tips and avoiding common mistakes, you’ll be well on your way to creating stunning decoupage artwork that will enhance any room.
Tips for Working with Different Materials
Decoupage can be applied to a wide range of materials, including wood, metal, glass, and even fabric. Here are some tips for working with different materials:
- Wood: use a medium specifically designed for decoupage on wood
- Metal: use a special adhesive or sealant to protect the metal from corrosion
- Glass: apply a thin layer of varnish or decoupage medium to prevent the image from peeling off
Frequently Asked Questions
Q: What type of adhesive is best for decoupage?
A: A good-quality decoupage medium or varnish works well for decoupage. Look for products specifically designed for this purpose, as they will provide a strong bond and easy clean-up.
Q: Can I use any type of image for decoupage?
A: Yes! You can use a wide range of images for decoupage, including prints from books or magazines, photographs, or even hand-drawn designs. Just make sure the image is large enough to fit on your surface and that it’s not too complex.
Q: How do I remove bubbles from my decoupage?
A: If you notice any air bubbles forming during the application process, use a small tool (such as a chopstick or pencil) to gently push them out. Be careful not to scratch the surface!
Q: Can I use paint with decoupage?
A: Yes! Paint can be used in combination with decoupage for added color and texture. Just make sure to apply a thin layer of varnish after painting to seal everything in.
Q: How long does it take for decoupage to dry completely?
A: This depends on the type of adhesive you’re using, but most decoupages dry within 24 hours. Be patient and allow plenty of time for each layer to dry before adding more.
Q: Can I use decoupage with any type of fabric or paper?
A: Yes! However, not all fabrics or papers are suitable for decoupage. Look for materials specifically designed for this purpose, such as cotton or linen fabrics, or high-quality printing paper.
Inspiration and Ideas
Decoupage is a versatile art form that can be used to create stunning pieces of furniture. Here are some inspiration ideas to get you started:
- Create a decoupage mirror frame with vintage images
- Add decoupage images to your dresser or side table for a unique touch
- Use decoupage to add color and texture to your chair upholstery
- Create a decoupage headboard for your bed using fabric, paper, or other materials
Conclusion
Reviving vintage furniture with decoupage is a fun and rewarding project. With the right supplies and a bit of practice, you can create beautiful, one-of-a-kind designs that reflect your personal style. So why not give decoupage a try? Your next furniture project could be just around the corner.
Getting Started
Ready to start your decoupage journey? Here are some steps to get you started:
- Choose a piece of furniture that needs a makeover
- Clean and prepare the surface for decoupage
- Select your decoupage supplies, including stencils, cut-out images, adhesive medium, and varnish
- Cut out your decoupage images using scissors or a craft knife
- Apply your first layer of decoupage, smoothing out any air bubbles with your fingers
- Add additional layers as needed, allowing each layer to dry completely before adding more
Don’t be afraid to experiment and try new things! With practice and patience, you’ll become a master decoupage artist in no time.
Conclusion
Reviving vintage furniture with decoupage is a fun and rewarding project that can add a unique touch to any room. By following these tips and avoiding common mistakes, you’ll be well on your way to creating stunning decoupage artwork that will enhance your personal style. So why not give decoupage a try? Your next furniture project could be just around the corner!


