
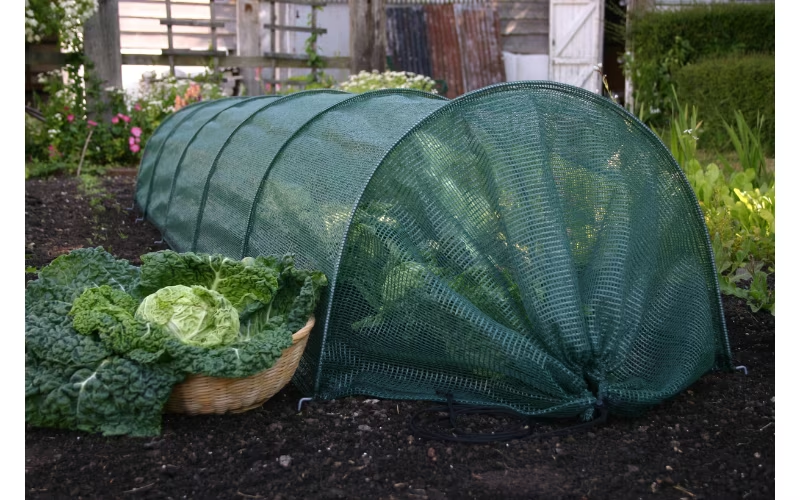
As a gardener, you’re always on the lookout for innovative ways to increase your harvest and reduce maintenance. That’s why we’re excited to introduce you to the concept of an “anti-pest tunnel” – a game-changing solution that keeps unwanted weeds out of your garden while allowing your plants to thrive.
What is an Anti-Pest Tunnel?
An anti-pest tunnel, also known as a weed barrier tunnel or crop tunnel, is a practical solution for gardeners. This type of tunnel consists of rigid PVC modules that are recycled and reused. Each module is 1.5 meters long and comes in standard diameters (16, 20, or 25 centimeters). The module has holes that are 60 millimeters in diameter, spaced 30 centimeters apart.
How Does an Anti-Pest Tunnel Work?
When you place the anti-pest tunnel on top of your garden bed, it creates a physical barrier that prevents weeds from growing between plants. The holes in the tunnel allow for good air circulation and light penetration, promoting healthy plant growth. By keeping weeds out, you’ll reduce competition for water, nutrients, and sunlight, giving your plants a better chance to thrive.
When to Use an Anti-Pest Tunnel?
The anti-pest tunnel should be applied at the time of planting, when you fill the pre-dug holes with plants. This ensures that the tunnel is securely in place and can provide optimal protection for your seedlings during their first growth stage.
How to Install an Anti-Pest Tunnel
Installing an anti-pest tunnel is easy: simply place it on top of the previously prepared bed and add irrigation system if desired. Once installed, plant the seedlings in the holes. You can also use the tunnel as a mini-greenhouse by covering it with row covers or other transparent materials.
Benefits of Using an Anti-Pest Tunnel
The anti-pest tunnel has been tested successfully with numerous crops and can be beneficial for growing:
• Tomatoes
• Zucchini
• Potatoes
• Kale
• Lettuce
• Strawberries
This innovative solution offers several benefits, including:
• Easy Installation: The anti-pest tunnel is lightweight and easy to assemble, making it a great option for gardeners of all skill levels.
• Durability: The PVC modules are durable and can be reused multiple times, reducing waste and saving you money in the long run.
• Weed Prevention: By keeping weeds out, you’ll reduce competition for water, nutrients, and sunlight, giving your plants a better chance to thrive.
Limitations of Using an Anti-Pest Tunnel
While the anti-pest tunnel offers many benefits, it’s not without its limitations. One major limitation is controlling the growth of weeds. Weeds won’t grow between rows, but they can still thrive freely between each row, so additional weeding may be necessary.
Another limitation is the size of the holes: while the 60-centimeter diameter holes are perfect for plants like melons and tomatoes, they may not provide enough space for other plants like fennel to grow.
Tips for Maximizing Your Anti-Pest Tunnel’s Potential
To get the most out of your anti-pest tunnel:
• Use a combination of row covers and irrigation systems to create a mini-greenhouse effect.
• Choose crops that are well-suited for tunnel growth, such as leafy greens and tomatoes.
• Consider using additional weed control methods, such as mulching or hand-weeding.
Common Challenges and Solutions
Some gardeners may experience challenges with their anti-pest tunnels. Here are some common issues and solutions:
- Holes not sealing properly: Check that the PVC modules are securely fastened to each other and to the ground.
- Weeds growing between rows: Use additional weed control methods, such as mulching or hand-weeding, to prevent weeds from competing with your plants.
- Plants not growing well: Ensure that your plants are receiving enough light and water. Adjust the tunnel’s position or add additional irrigation if necessary.
How to Choose the Right Anti-Pest Tunnel for Your Garden
When selecting an anti-pest tunnel, consider the following factors:
• Size: Choose a tunnel that is large enough to accommodate all of your plants, but not so large that it becomes unwieldy.
• Material: PVC modules are durable and easy to clean, making them a great choice for most gardens.
• Price: Consider the cost of the tunnel and any additional materials you may need, such as irrigation systems or row covers.
Comparing Anti-Pest Tunnels
If you’re considering multiple anti-pest tunnels for your garden, here’s a comparison of some popular options:
- 16 cm diameter tunnel: This is a great option for small gardens or those with limited space.
- 20 cm diameter tunnel: This size is suitable for medium-sized gardens and offers more flexibility in terms of plant spacing.
- 25 cm diameter tunnel: This is the largest size available and provides ample space for large plants like tomatoes and squash.
Combining Anti-Pest Tunnels with Other Gardening Techniques
The anti-pest tunnel can be used in combination with other gardening methods to create a diverse and thriving garden. Here are some ideas:
- Crop rotation: Rotate your crops seasonally to ensure that your garden is not depleted of nutrients.
- Companion planting: Plant complementary plants together, such as basil and tomatoes, to improve growth and flavor.
- Mulching: Apply a layer of mulch around your plants to retain moisture and suppress weeds.
How to Reuse an Old Anti-Pest Tunnel
If you’re looking for ways to reduce waste and save money on new tunnels, consider reusing old ones. Here are some tips:
- Clean and disinfect: Thoroughly clean and disinfect the tunnel before reuse.
- Repair any damage: Inspect the tunnel for any damage or wear and tear and make repairs as needed.
- Reassemble: Reassemble the tunnel using the original modules or new ones.
Conclusion
The anti-pest tunnel is an innovative solution that can help you increase your harvest and reduce maintenance. By providing a physical barrier against weeds and promoting healthy plant growth, this game-changing technology has the potential to revolutionize the way we garden.
By understanding how to use an anti-pest tunnel effectively, you’ll be able to create a thriving and productive garden that will provide you with fresh produce for years to come.
Frequently Asked Questions (FAQs)
Q: What types of crops are well-suited for growing in an anti-pest tunnel?
A: Tomatoes, zucchini, potatoes, kale, lettuce, and strawberries are all great options for growing in an anti-pest tunnel.
Q: How long do anti-pest tunnels typically last?
A: The lifespan of an anti-pest tunnel depends on factors such as quality, usage, and storage conditions. With proper care, a well-made anti-pest tunnel can last for several seasons.
Q: Can I use multiple anti-pest tunnels together?
A: Yes, you can use multiple anti-pest tunnels to create a larger garden bed or to divide your crop into separate sections.
Q: How often should I clean and maintain my anti-pest tunnel?
A: Regular cleaning and maintenance are essential for extending the lifespan of your anti-pest tunnel. Check for damage, remove debris, and disinfect regularly.
Q: Are there any specific tools required for installing an anti-pest tunnel?
A: No special tools are required, but a shovel or trowel can be helpful for digging holes and preparing the soil.
Q: Can I use an anti-pest tunnel in combination with other gardening techniques?
A: Yes, the anti-pest tunnel can be used in conjunction with other gardening methods, such as mulching, companion planting, and crop rotation.
Q: How much does an anti-pest tunnel cost?
A: The cost of an anti-pest tunnel varies depending on size, material, and quality. Expect to pay between $20 to $100 for a standard tunnel.
Q: Are anti-pest tunnels suitable for small gardens or indoor growing?
A: Yes, anti-pest tunnels can be used in small gardens or as mini-greenhouses for indoor growing. They’re perfect for container gardening or growing microgreens.
Q: Can I reuse an old anti-pest tunnel?
A: While it’s technically possible to reuse an old anti-pest tunnel, we recommend replacing it every 5-7 years to ensure optimal performance and durability.


