
Understanding Mealworms and Their Importance as a Food Source
When it comes to feeding animals like reptiles, amphibians, birds, and fish, mealworms are an excellent source of fresh vitamins and proteins. But have you ever wondered how to raise these beneficial insects yourself? In this article, we’ll explore the world of mealworm breeding, covering everything from setup to care and handling.
What are Mealworms?
Mealworms (Tenebrio Molitor) are commonly known as meal moths. These larvae are raised and sold in dry form, powder or live as food for certain animals. They’re not just a living diet for “pet” animals but are also used as bait for fishing.
Why Raise Mealworms?
Raising mealworms has become increasingly popular among animal enthusiasts and breeders. By feeding them substances that inhibit their life cycle, breeders can control the size and weight of the larvae, creating an ideal food source for various animals. Additionally, mealworms are a great way to reuse waste materials like flour, bread, and cereals.
The Life Cycle of Mealworms
Mealworms undergo a unique life cycle that allows for frequent generational turnover. However, this process requires attention to detail. Here’s an overview of the different stages:
- Larvae: Mealworms feed on starch-based foods like flour, bread, and cereals.
- Pupae: When larvae reach their maximum development, they form pupae and transform into adults after 10-15 days.
- Adults: Adult mealworms are black shiny insects that can reproduce and lay eggs within a few days.
Setting Up Your Mealworm Breeding System
To raise mealworms, you’ll need the following materials:
- Plastic container with a lid: Use an old gelato container or one sold at supermarkets for food purposes.
- Skewer or knife: Find “lucky” ones by digging through old boxes of pasta and cereals in an old dresser… or visit a fishing store or aquarium supplies store.
- Food to support larval reproduction: Use flour, crumbled bread, dry porridge, flaked oats, or any other cereal-based food source.
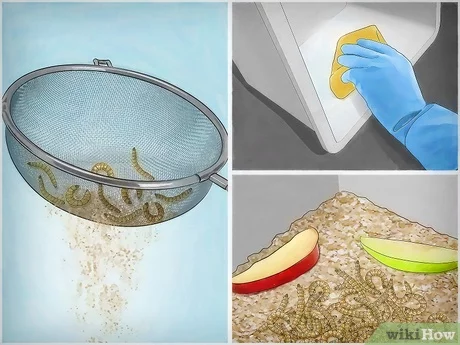
- Sieve: An old zanzarina is also suitable.
Step-by-Step Instructions for Raising Mealworms
- Prepare your container by making small holes in the bottom to allow air circulation and prevent mold formation.
- Add a substrate like flour, cereals, or crushed bread to the container, leaving enough space for the mealworms to move around.
- Place the mealworms on top of the substrate.
- Feed the mealworms foods rich in liquids like potatoes or carrots every week.
- Replace the substrate monthly and sift it regularly to prevent mold growth.
Tips and Tricks for Successful Mealworm Breeding
- Keep your breeding system dry to prevent other microorganisms from growing.
- Separate adults from larvae to prevent them from devouring eggs laid by adults or eating pupae.
- Move larvae to a second container when they form pupae, allowing them to become adult insects and reproduce.
Tips for Breeding Different Sizes of Mealworms
- Start with the smallest mealworms (0-1 mm) as soon as you see the first signs of life.
- Feed the mealworms foods rich in starches like flour, bread or cereals to grow them faster.
- Increase the substrate density by adding more food as they develop.
Tips for Maintaining a Healthy Mealworm Population
- Maintain humidity levels between 50-60% to prevent dehydration and mold growth.
- Keep your breeding system away from direct sunlight, which can lead to overheating and stress on the mealworms.
- Handle the mealworms gently and only when necessary.
Common Problems in Mealworm Breeding
- Mold Growth: Regularly check for signs of mold growth like white or greenish powder on the substrate. Replace the substrate immediately to prevent harm to your mealworms.
- Dehydration: Keep an eye out for dry, shriveled mealworms that can be dead due to dehydration. Sift them regularly and provide enough moisture in their environment.
Handling Mealworms
To avoid stressing your mealworms, follow these guidelines when handling them:
- Use gloves or a tweezers to handle the mealworms.
- Handle them gently but firmly.
- Avoid squeezing or pinching the mealworms.
Conclusion
Raising mealworms is a fun and rewarding experience that requires minimal setup and care. By following these steps and tips, you can successfully breed these beneficial insects and provide them as a nutritious food source for your pets. Happy breeding!
Frequently Asked Questions
Q: What are the benefits of raising mealworms?
A: Mealworms are an excellent source of fresh vitamins and proteins for carnivorous animals like reptiles, birds, turtles, amphibians, and fish.
Q: How do I care for my mealworm breeding system?
A: Keep your breeding system dry to prevent mold growth, replace the substrate monthly, and sift it regularly. Separate adults from larvae to prevent them from devouring eggs laid by adults or eating pupae.
Q: What are some common mistakes when raising mealworms?
A: Common mistakes include not keeping the breeding system dry, not separating adults from larvae, and not replacing the substrate regularly.
Q: Can I raise mealworms indoors?
A: Yes, you can raise mealworms indoors in a well-ventilated area with minimal temperature fluctuations.


