
Composting is a simple and effective way to recycle organic waste, creating a natural fertilizer for your garden. By making your own compost bin, you can reduce the amount of waste you throw away and create a nutrient-rich soil amendment. But where do you start?
Benefits of Composting
Composting offers numerous benefits, including:
- Reducing waste sent to landfills
- Creating a natural fertilizer for your garden
- Saving money on fertilizers and soil amendments
- Helping the environment by reducing greenhouse gas emissions
But before we dive into the process, let’s explore why composting is so important.
Why Composting Matters
Composting is an essential practice that can have a significant impact on the environment. By reducing waste sent to landfills, we can:
- Reduce methane emissions, which contribute to climate change
- Conserve natural resources by reusing organic materials
- Create a more sustainable food system
So, are you ready to make your own compost bin and start recycling?
Materials Needed
To make your own compost bin, you’ll need the following materials:
- A plastic bucket (at least 12 inches deep)
- Zanzariera fabric (depending on the size of the bucket)
- Plastic string
- Drill
- Glue
- Expanded clay
- Soil
- Worms
You may already have some of these materials at home, making it an even more accessible and affordable option.
Step-by-Step Instructions
Making your own compost bin is a simple process that requires some basic materials and tools. Here’s a step-by-step guide:
- Turn the plastic bucket upside down: Start by turning the plastic bucket upside down and using a drill to make holes about 1/2 inch in diameter both at the bottom and sides.
- Cut the zanzariera fabric: Cut the first piece of zanzariera to place on the bottom, leaving a 10 cm margin beyond the rim of the bucket.
- Secure the netting: Place the netting on the bottom and secure it with garden lace through the holes made on the bottom.
- Cut the second circle: Cut another circle equal to the circumference of the bottom plus 10 cm, and place it on top of the expanded clay.
- Add soil and worms: Add some soil and add worms to start the composting process.
Compost Bin Ready for Use: Prices and Models
If you find the process of making a compost bin too complicated, you can buy a pre-made “bell-shaped” compost bin. These bins are available in various sizes, ranging from 80 to 900 liters, and come with prices that won’t break the bank.
Some popular compost bin models include:
- NatureMill Compost Bin: A compact and easy-to-use composting system
- Worm Factory Compost Bin: A worm-based composting system for indoor use
- Green Earth Compost Bin: A large-capacity compost bin made from durable materials
What Can Be Put in the Compost Bin?
Before adding materials to your compost bin, it’s essential to know what can be included. Here are some guidelines:
- Kitchen scraps (fruits and vegetables)
- Garden waste
- Yard trimmings
- Leaves
Avoid adding the following materials to your compost bin:
- Meat, bones, and dairy products
- Pet waste
- Weeds with seeds
Tips and Tricks
Here are some additional tips and tricks to help you make the most of your compost bin:
- Add a layer of brown materials (e.g., leaves or straw) on top of green materials (e.g., kitchen scraps)
- Keep the compost bin covered to prevent pests and odors
- Turn the compost regularly to maintain oxygen flow
Common Questions
Here are some frequently asked questions about composting:
Q: How often should I turn the compost?
A: Turn the compost every 7-10 days to maintain oxygen flow.
Q: What is the best way to manage pests and odors?
A: Add a layer of brown materials on top of green materials, and keep the compost bin covered.
Q: Can I add pet waste to my compost bin?
A: No, avoid adding pet waste to your compost bin as it can attract pests and create unpleasant odors.
Q: How long does it take for the compost to be ready?
A: Composting takes time, typically 2-3 months, depending on factors like temperature, moisture, and carbon-to-nitrogen ratios.
Maintaining Your Compost Bin
To keep your compost bin healthy and thriving, follow these maintenance tips:
- Check the moisture level regularly
- Add more brown materials as needed to balance out green materials
- Monitor for pests and odors, and take action promptly if necessary
Benefits of Worm Composting
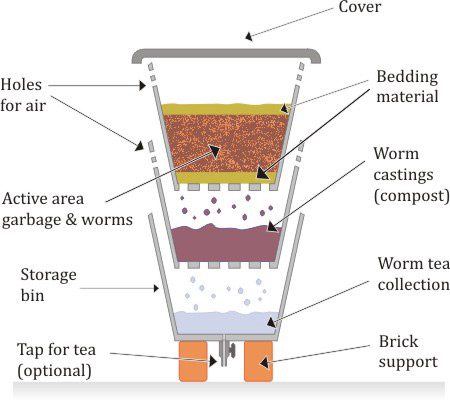
Worm composting is a popular method of composting that uses worms to break down organic waste. Here are some benefits of worm composting:
- High nutrient retention
- Fast decomposition rate
- Minimal odor production
To get started with worm composting, you’ll need the following materials:
- Red wiggler worms (Eisenia fetida)
- Bedding material (e.g., shredded newspaper or coconut coir)
- Organic waste (e.g., kitchen scraps)
Benefits of Bokashi Composting
Bokashi composting is a fermentation-based method of composting that uses microorganisms to break down organic waste. Here are some benefits of bokashi composting:
- Fast decomposition rate
- Minimal odor production
- Can be done indoors
To get started with bokashi composting, you’ll need the following materials:
- Bokashi bin (e.g., a plastic container or bag)
- Microorganisms (e.g., bokashi bran or compost tea)
- Organic waste (e.g., kitchen scraps)
Conclusion
Making your own compost bin is a simple and effective way to recycle organic waste, creating a natural fertilizer for your garden. By following these steps and tips, you can reduce the amount of waste sent to landfills, conserve natural resources, and create a more sustainable food system.
Whether you choose to make your own compost bin or buy one, remember that composting is an essential practice for creating a healthier planet. Happy composting!


