
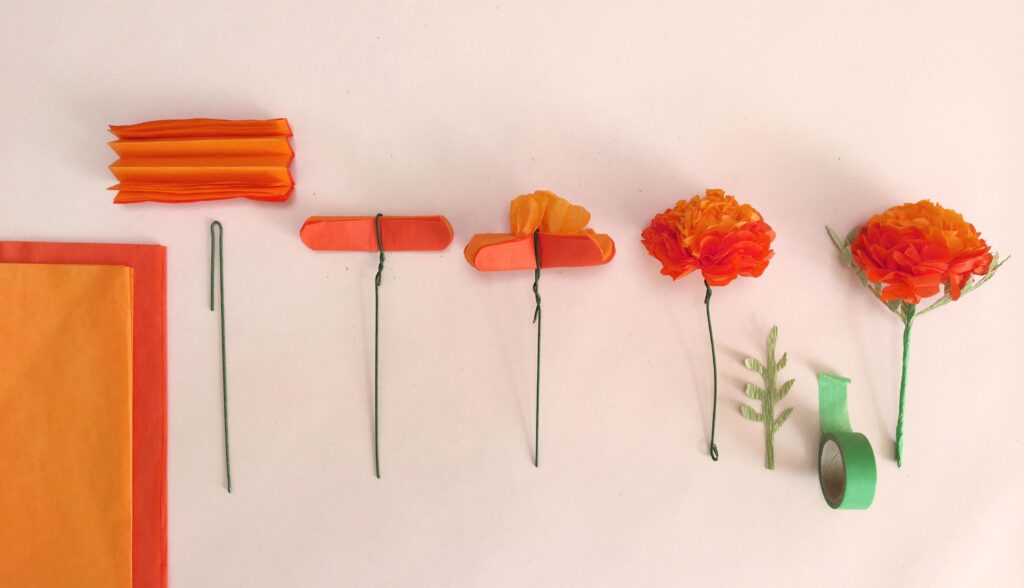
As we delve into the world of paper flowers, it’s impossible not to be amazed by the endless possibilities! With just a little manual dexterity and experience, you can create an almost infinite number of beautiful creations that are tailored to your preferences and desired outcome.
Before we dive into the nitty-gritty of making paper flowers, let’s take a moment to appreciate how versatile they are for decorating packages, walls, tables runners, and much more. Whether you’re looking to add a personal touch to a special occasion or simply want to bring some magic into your life, paper flowers are an ideal choice.
If you’re new to the world of paper flowers, don’t worry – we’ve got you covered! Here’s a beginner’s guide to get you started on this wonderful journey. From choosing the right paper to mastering the techniques, we’ll take it one step at a time, so you can create your own stunning paper flowers.
Choosing the Right Paper
When it comes to selecting the perfect paper for your paper flowers, there are countless options available. However, it’s essential to consider the desired effect and outcome of your creation.
One popular choice is crepe paper, which is ideal for creating intricate, textured flowers with a realistic appearance. Crepe paper is easy to work with and allows you to achieve a high volume of flowers in various colors. Another option is origami paper, which is perfect for making delicate, precise cuts and folds. Origami paper is also great for beginners, as it’s forgiving and easy to handle.
If you’re looking for a more traditional look, consider using tissue paper or wax paper. Tissue paper is lightweight, soft, and suitable for creating delicate flowers with intricate details. Wax paper, on the other hand, offers a unique texture and can be used to create stunning, high-contrast flowers.
When choosing your paper, also think about its durability and resistance to moisture. Some papers may be more prone to tearing or bending, while others will hold up better against wear and tear. Consider factors like the occasion for which you’ll be using your flower, as well as how long it will be on display.
Types of Paper Flowers
There are countless types of paper flowers that you can create, each with its own unique characteristics and uses. Here are a few examples:
- Rose: A classic choice for any occasion, roses are easy to make and require minimal materials.
- Daisy: Brighten up your day with a cheerful daisy made from tissue paper or crepe paper.
- Lily: Create stunning lilies using origami paper or wax paper for an elegant touch.
- Sunflower: Make a bright and cheerful sunflower using tissue paper or crepe paper to add some warmth to any room.
Basic Instructions for Making Paper Flowers
Now that you’ve chosen your paper, it’s time to start making your first paper flower! To begin, we’ll cover a simple yet beautiful design using crepe paper. Here’s how:
- Cut out the petal shapes: Start by cutting out petal shapes from your crepe paper. You can use a template or create your own shapes.
- Create the center of the flower: Use a small piece of paper to create the center of the flower. This will be used for the pistil and stamens.
- Assemble the flower: Begin assembling the flower by attaching the petals to the center using a small amount of glue or a floral tape.
Tips and Variations
- Experiment with different paper textures, colors, and patterns to create unique and stunning flowers.
- Add embellishments like beads, sequins, or ribbons to give your flowers an extra touch of elegance.
- Try using different folding techniques, such as accordion folds or crisscross folds, to add dimension and texture to your flowers.
Folding Techniques
To take your paper flower game to the next level, try incorporating various folding techniques into your designs. Here are a few examples:
- Accordion Fold: Use this technique to create delicate petals that will add depth and volume to your flower.
- Crisscross Fold: Add a crisscross fold to create intricate details and texture in your flowers.
- Zigzag Fold: Try using zigzag folds to create an interesting and dynamic look.
Embellishments
Add a personal touch to your paper flowers by incorporating embellishments. Here are some ideas:
- Beads: Use small beads to add a pop of color or create intricate details in your flower.
- Sequins: Add sequins for a sparkly effect that will catch the light.
- Ribbons: Try using ribbons to create beautiful bows and accents.
Troubleshooting Common Issues
Making paper flowers can be challenging, but don’t worry – we’ve got you covered! Here are some common issues and solutions:
- Petal tears: Use a small amount of glue or floral tape to repair any tears.
- Flower distortion: Try using a ruler or straightedge to create crisp folds and prevent distortion.
Conclusion
Making paper flowers is a fun and rewarding hobby that allows you to express your creativity and bring joy to others. With these simple instructions, tips, and techniques, you’re ready to start making your own stunning paper flowers!
Frequently Asked Questions (FAQs)
- What type of paper should I use for making paper flowers?
- The best paper to use depends on the desired effect and outcome of your creation.
- How do I choose the right size paper for my flower?
- Use a template or calculate the size of your flower based on its design.
- Can I make paper flowers with everyday objects like newspaper or magazine cutouts?
- Yes! Experimenting with different materials can lead to unique and fascinating results.
- What is the best way to attach my petals to the center of the flower?
- Use a small amount of glue, floral tape, or another adhesive suitable for paper flowers.
- How do I care for my paper flowers?
- Handle with care, avoid direct sunlight, and store in a cool, dry place to maintain their longevity.
By following these guidelines and tips, you’ll be well on your way to becoming a skilled paper flower artist! Don’t be afraid to experiment and try new things – the world of paper flowers is full of endless possibilities.


