
Introduction
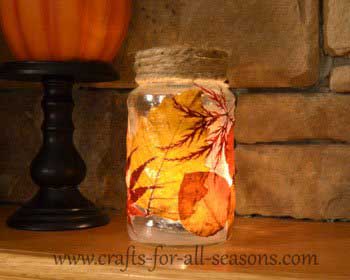
When it comes to home decor, nature plays a vital role. From the plants in our apartments to the more complex techniques of natural painting, nature can help us create stunning decorations. One such technique is decoupage, and when combined with real leaves, it becomes a truly unique and captivating art form.
Decoupage has been around for centuries, originating from 15th-century Europe as a way to decorate furniture with cut-out images. Over time, the technique evolved, and various materials were incorporated into the process. The addition of natural elements like leaves adds an extra layer of depth and visual interest to decoupage projects.
The Power of Nature
Nature has long been an inspiration for artists and decorators alike. The colors and textures of its elements can add depth and character to any room. In the case of decoupage with real leaves, the natural world provides an endless array of materials to work with. Leaves in particular offer a wealth of options, from delicate ferns to vibrant autumn hues.
The diversity of leaf shapes, sizes, and colors creates endless possibilities for designs and patterns. By incorporating natural elements like leaves into our decor, we can bring a sense of serenity and harmony into our spaces. The process of decoupage with real leaves also encourages us to connect with nature and appreciate its beauty.
Choosing the Right Material
When it comes to decoupage with real leaves, the right material is crucial. Vetro (glass) is the ideal support for this technique. Plates and vases made of glass can be used, but experience may be necessary to get the best results. The transparency of glass allows the natural beauty of the leaves to shine through.
Glass is a popular choice because it provides a neutral background that won’t compete with the natural colors of the leaves. Additionally, glass is a versatile material that can be used in various shapes and sizes, making it easy to incorporate into any decoupage project.
Preparing the Leaves
Before starting the decoupage process, it’s essential to prepare the leaves. They must be dried and pressed to remove excess moisture. This step ensures that the leaves adhere evenly to the surface of the glass. To achieve this, a layer of colla vinilica (vinyl adhesive) is applied to the glass, followed by the pressing of the leaves onto the surface.
Pressing the leaves onto the glass requires patience and care. The heat from the press helps to remove excess moisture from the leaves, allowing them to adhere evenly to the glass. This step is crucial in achieving a successful decoupage project.
Applying the Leaves
Once the leaves are prepared, it’s time to apply them to the glass. A second layer of colla vinilica is spread evenly over the surface, including the leaves. Finally, a layer of carta di riso (rice paper) is applied, and another coat of colla vinilica is added.
The application process requires attention to detail and patience. The leaves must be aligned carefully to ensure even coverage and minimize gaps between them. This step also provides an opportunity for experimentation with different leaf arrangements and patterns.
Removing Excess Paper
After the paper has dried, it’s time to remove the excess material. This step requires care, as any mistakes can be difficult to correct. To avoid damaging the surrounding area, a small tool or tweezers should be used to carefully remove the excess paper.
The process of removing excess paper may take some time and patience, but the end result is well worth it. A smooth finish will be achieved, and the natural beauty of the leaves will be visible on the surface of the glass.
Adding a Protective Coat
To make the decoupage more resistant and durable, multiple coats of transparent vernice (varnish) are applied. An alternative option is vetrificante a base d’acqua (aqueous varnish), which provides an additional layer of protection.
Applying multiple layers of varnish requires careful consideration to avoid creating a thick, sticky surface. A smooth finish will be achieved by applying even coats of vernice and allowing each layer to dry before adding the next.
Tips and Tricks
To achieve the best results with decoupage with real leaves, follow these tips:
- Choose the right materials: Vetro (glass) is essential for this technique.
- Prepare your leaves carefully: Drying and pressing the leaves is crucial for even adhesion.
- Apply a smooth coat of vernice: This ensures a protective finish and prevents uneven coverage.
- Experiment with different leaf arrangements: Create unique patterns and designs by playing with different leaf shapes and sizes.
Conclusion
Decoupage with real leaves is a unique and captivating art form that can add a touch of natural beauty to any room. With the right materials, preparation, and attention to detail, this technique can create stunning results. Whether you’re looking to decorate a single vase or an entire space, decoupage with real leaves is an excellent choice.
Frequently Asked Questions
- What type of glass should I use for decoupage with real leaves?
Vetro (glass) is the ideal material for this technique. - How do I prepare my leaves for decoupage?
Drying and pressing the leaves are essential steps to ensure they adhere evenly to the surface. - What type of adhesive should I use for decoupage with real leaves?
Colla vinilica (vinyl adhesive) is a popular choice, but vetrificante a base d’acqua (aqueous varnish) can also be used. - How many coats of transparent vernice do I need to apply for optimal protection?
The number of coats required will depend on the desired level of protection and durability. - Can I use any type of glass for decoupage with real leaves?
Vetro (glass) is recommended, as it allows the natural beauty of the leaves to shine through. - How do I remove excess paper from my decoupage project?
Care must be taken when removing excess material to avoid damaging the surrounding area. - What are some common mistakes to avoid when doing decoupage with real leaves?
Mistakes can include uneven leaf placement, insufficient adhesive application, and poor surface preparation. - Can I use different types of leaves for decoupage projects?
Yes, a variety of leaves can be used to create unique and interesting designs. - How do I store my decoupage project after it has dried?
Proper storage will help maintain the integrity of the piece over time. -
Can I use decoupage with real leaves on any type of surface?
No, surfaces such as wood or metal may not be suitable for this technique due to their texture and material composition. -
How long does it take for a decoupage project to dry completely?
The drying time will depend on the specific materials used and environmental conditions. -
Can I use different types of adhesive for decoupage with real leaves?
Yes, alternatives to colla vinilica (vinyl adhesive) can be used, but vetrificante a base d’acqua (aqueous varnish) is recommended for added protection. -
How do I achieve a smooth finish when using decoupage with real leaves?
Smooth finishes are achieved by applying even coats of colla vinilica and allowing each layer to dry before adding the next. - Can I use multiple layers of leaf material in my decoupage project?
Yes, using multiple layers can create a more complex and textured design. - How do I clean my decoupage project after it has dried?
Cleaning methods will depend on the surface type; general caution should be exercised when cleaning delicate surfaces.
By following these guidelines and experimenting with different materials and techniques, you’ll be well on your way to creating stunning decoupage projects with real leaves.


