
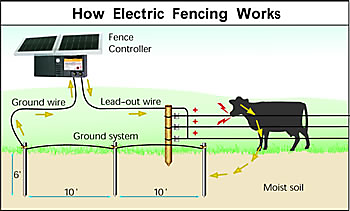
As a homeowner, you may have considered installing an electric fence to keep your animals or crops secure. In this article, we’ll provide a detailed guide on how to create an electric fence using metallic wires, posts, and electrifiers.
What You Need to Know
To create an electric fence, you need three essential components:
- Posts: These are the vertical supports that hold up the wire.
- Electrifiers: These devices deliver the electrical current to the wire.
- Wires and Insulators: These provide the path for the electricity to flow.
Designing Your Electric Fence
Before you start building, consider your fence’s purpose and size. If it will be used to keep animals out, you may need a more powerful electrifier. You’ll also want to ensure that the posts are spaced at regular intervals, with no gaps in between.
When designing your electric fence, consider the following:
- Posts: Use sturdy posts made of wood or metal, and make sure they’re well-anchored in the ground.
- Wires: Use insulated wires to prevent accidental contact with the electrified wire. You may also want to add extra insulation to prevent damage from weather conditions.
- Electrifiers: Choose an electrifier that’s suitable for your fence size and purpose. Make sure it’s installed correctly and securely.
Choosing the Right Materials
When selecting materials for your electric fence, keep the following in mind:
- Posts: Look for posts made of durable materials like wood or metal.
- Wires: Choose wires that are resistant to corrosion and weather damage. Insulated wires can also help prevent accidental contact with the electrified wire.
- Electrifiers: Select an electrifier that’s suitable for your fence size and purpose. Consider factors like power output, insulation, and durability.
Step-by-Step Guide to Creating an Electric Fence
Here’s a step-by-step guide to creating an electric fence:
Step 1: Prepare the Site
Before starting construction, clear the area of any debris or obstructions. Mark out the boundary of your fence using stakes and twine.
Tools Needed:
- Measuring tape
- Stakes
- Twine
- Post hole digger (if necessary)
Step 2: Install Posts
Dig holes for each post, about 12 inches deep and 18 inches wide. Fill with concrete to secure them in place.
Materials Needed:
- Post holes
- Concrete mix
- Water
- Wood or metal posts
- Anchor (if necessary)
Step 3: String the Wire
Begin at one end of the fence line and string the wire between posts, using wire clips or ties to secure it. Make sure the wire is taut but not too tight.
Tools Needed:
- Wire cutters
- Wire strippers
- Wire clips or ties
- Pliers (optional)
Step 4: Install Electrifiers
Mount the electrifier to a post or the ground, following the manufacturer’s instructions. Connect the wire to the electrifier and ensure proper insulation.
Materials Needed:
- Electrifier box or mount
- Wire
- Insulation
- Electrical tape
- Tools (e.g., drill, wrench)
Step 5: Test and Adjust
Turn on the electrifier and test the fence by walking along it while wearing protective clothing. Adjust the tension of the wire and the power output of the electrifier as needed.
Safety Precautions:
- Wear insulated gloves and safety glasses when working with electricity.
- Ensure that the fence is secure before testing.
- Test the fence in multiple locations to ensure proper function.
Common Mistakes to Avoid
When creating an electric fence, avoid these common mistakes:
- Incorrect Post Spacing: Make sure posts are spaced at regular intervals to prevent gaps in the fence.
- Insufficient Wire Insulation: Use insulated wires to prevent accidental contact with the electrified wire.
- Inadequate Electrifier Installation: Follow the manufacturer’s instructions when installing an electrifier.
Conclusion
Creating an electric fence requires careful planning and attention to detail. By following these steps, avoiding common mistakes, and choosing the right materials, you can create a secure and effective barrier for your animals or crops.
Here are some frequently asked questions about creating an electric fence:
-
What materials should I use for my electric fence?
- Posts: sturdy wood or metal
- Wires: insulated wires resistant to corrosion and weather damage
- Electrifiers: suitable for your fence size and purpose
- How do I install an electrifier?
Follow the manufacturer’s instructions, ensuring proper insulation and secure mounting.
3. What are some common mistakes to avoid when creating an electric fence?Incorrect post spacing, insufficient wire insulation, inadequate electrifier installation
4. Can I use a pre-made kit for my electric fence?Yes, consider purchasing a kit that includes all necessary materials and instructions.
5. How often should I check and maintain my electric fence?Regularly inspect the fence for damage or wear, ensuring proper function and safety.
By following these guidelines and FAQs, you’ll be well on your way to creating an effective and secure electric fence for your needs.
Additional Tips and Considerations
- Weather Resistance: Ensure that all materials are weather-resistant to prevent damage from extreme temperatures, rain, or snow.
- Local Regulations: Check with local authorities to ensure compliance with regulations regarding electric fences in your area.
- Maintenance Schedule: Regularly inspect the fence for damage or wear and perform maintenance tasks as needed.
Conclusion
Creating an electric fence is a rewarding DIY project that requires careful planning, attention to detail, and a commitment to safety. By following this comprehensive guide, you’ll be able to create a secure and effective barrier for your animals or crops.


