
Are you ready to unleash your creativity and create a beautiful, eco-friendly girandola all by yourself? Look no further! In this article, we’ll guide you through the process of making a stunning paper girandola that will add a touch of elegance to any event or space.
A Brief Introduction to Paper Girandolas
Paper girandolas have been a popular DIY project for years, and it’s easy to see why. Not only are they an excellent way to get creative with recycled materials, but they’re also an environmentally friendly alternative to traditional plastic decorations. Plus, kids can easily make them with minimal supervision, making it a great activity for family bonding.
The Benefits of Paper Girandolas
So, what makes paper girandolas so special? For starters, they’re incredibly versatile and can be customized to fit any theme or occasion. Want to add a personal touch to your event or party? Try using colored paper or adding personalized decorations. Looking for a fun activity to do with kids? Paper girandolas are the perfect solution!
But here’s the best part: making a paper girandola is an excellent way to teach kids about the importance of renewable energy sources, such as windmills and turbines. It’s a great way to introduce them to nature’s power and how we can harness it in creative ways.
Gathering Materials
Before you start making your paper girandola, you’ll need a few simple materials:
- Scissors
- Pencil
- Square cardboard or recycled cardboard (squares)
- 1 can for the girandola
- 1 axle for the girandola
- 1 ruler
- Colorful paper or cardstock (optional)
- Decorative items (optional)
Don’t worry if you don’t have all of these materials on hand – we’ll guide you through each step.
Creating the Base
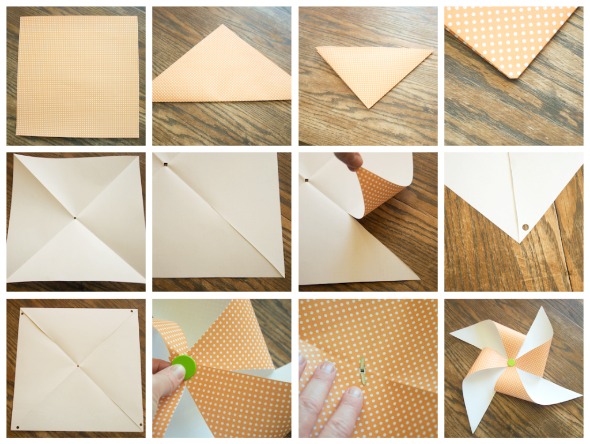
Start by drawing a few lines to create the base of your girandola. Using a ruler, mark the center of the square cardboard with a pencil. If you’re using printing paper, make sure to draw on the white side!
Take a deep breath and begin to cut out the diagonal lines that you’ve just drawn on your cardboard. Be careful not to go too close to the center – stop at about halfway.
Cutting Out the Strips
Next, use scissors to cut out long strips of paper from your colored cardstock or recycled paper. The length will depend on how tall you want your girandola to be. Try using different shapes and sizes to add some visual interest!
As you’re cutting out the strips, remember that the key is to create a sturdy structure for your girandola. You don’t want it to collapse under its own weight!
Assembling the Girandola
Now it’s time to fold in half the strips and attach them to each other. This will create the base of your girandola. Use a small amount of glue or tape to secure the folds.
Once they’re secure, insert the axle into its central point. Make sure it’s centered and evenly spaced – you don’t want any wobbly parts!
Balancing the Girandola
Act patiently, because this is where the magic happens! You want to make sure your girandola is solid and balanced – if not, it might collapse under the first gust of wind.
Take a step back and admire your handiwork. Make any necessary adjustments to ensure that your girandola is stable and secure.
Attaching the Axis
Hold the axis center with one hand and push the rest of the axis through a can. If you’re using paper tubes, feel free to attach them to a plastic tube or pencil for added stability.
Use adhesive tape to secure any loose parts – don’t want anything coming loose while your girandola is in use!
Adding the Finishing Touches
With your girandola securely attached, it’s time to add some finishing touches! Use decorative items like glitter, ribbons, or even small bells to give your girandola a personal touch.
Add any additional details, such as beads or sequins, to make your girandola truly unique. You can also experiment with different materials, like fabric or felt, to create a one-of-a-kind design.
Tips and Variations
The best part about making a paper girandola is that you can customize it in so many ways. Try experimenting with different materials, colors, and designs to create a truly unique piece of art. Don’t be afraid to push the boundaries – after all, this is your creative project!
Here are some additional tips and variations to try:
- Use recycled paper or cardboard to make your girandola even more eco-friendly.
- Add some movement to your girandola by attaching small weights or pebbles to the base.
- Experiment with different shapes and sizes of girandolas to create a unique display.
- Try using natural materials, like twigs or leaves, to create a more rustic design.
Conclusion
Making a paper girandola is an incredible DIY project that’s perfect for anyone looking to get creative and eco-friendly. With just a few simple materials, you can create a stunning decorative piece that will add a touch of elegance to any event or space.
So why not give it a try? Grab some cardboard, scissors, and glue, and start creating your own paper girandola today!
FAQs
- What kind of materials do I need to make a paper girandola?
- You’ll need scissors, pencil, square cardboard or recycled cardboard (squares), 1 can for the girandola, 1 axle for the girandola, and 1 ruler.
- How do I attach the axis to the girandola?
- Hold the axis center with one hand and push the rest of the axis through a can. Use adhesive tape to secure any loose parts.
- Can I use different materials for my girandola?
- Absolutely! Try experimenting with colored paper, cardstock, or even fabric to create a unique piece of art.
- How do I balance my girandola?
- Act patiently and make sure your girandola is solid and balanced – if not, it might collapse under the first gust of wind.
- Can kids make a paper girandola with minimal supervision?
- Yes! Paper girandolas are an excellent activity for family bonding and can be easily made with minimal supervision.
- How do I customize my girandola?
- Try experimenting with different materials, colors, and designs to create a truly unique piece of art. Don’t be afraid to push the boundaries!
- What is the best way to attach the girandola to a surface?
- Use adhesive tape or string to secure your girandola in place.
- Can I make a paper girandola with recycled materials only?
- Yes! Try using recycled cardboard, newspaper, or even old maps to create a truly eco-friendly decorative piece.
Additional Resources
If you’re looking for more inspiration or ideas for making your own paper girandolas, here are some additional resources:
- Check out our social media channels for more DIY projects and tutorials.
- Visit our website for a wide range of eco-friendly materials and supplies.
- Search online for other DIY girandola tutorials and ideas.
By following these steps and tips, you’ll be well on your way to creating a beautiful and eco-friendly paper girandola that will add a touch of elegance to any event or space. Happy crafting!


