
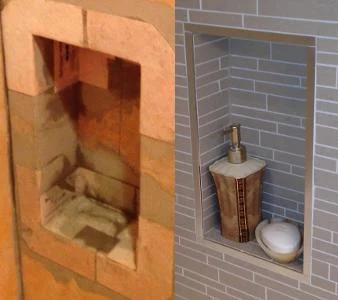
Creating a muratura shower niche is an excellent way to enhance the aesthetic and functionality of your bathroom. This guide will walk you through the fundamental aspects of designing, building, and finishing a shower niche in muratura, ensuring that your project turns out as desired.
Contents
- Designing the Shower Niche
- Building Techniques for a Muratura Shower Niche
- Finishing Touches and Maintenance
Designing the Shower Niche
Choosing the Right Materials
Opting for impermeable materials is key to creating a durable shower niche. Ceramic and porcelain are popular choices due to their durability and ease of cleaning. Natural stone, like marble, is also an excellent option although it requires more maintenance. Each material has its unique characteristics, so ensure you select one that complements your bathroom’s style and meets your practical needs.
Ideal Dimensions and Placement
The ideal dimensions for a shower niche depend on the intended use and the overall size of the bathroom. Smaller niches (30cm x 30cm) are perfect for storing soap and shampoo dispensers, while larger ones may be necessary to accommodate bigger items like towels or other accessories. The optimal placement is crucial as well; it should be easily accessible from inside the shower and ideally positioned at an angle that minimizes water splashing.
Compliance with Local Building Codes
Before starting your project, consider local building codes to ensure compliance. These regulations may dictate maximum height limits and positioning relative to plumbing fixtures or other structural aspects. Contacting your local building department for specific information will guarantee you are on the right track.
Waterproofing the Shower Niche
Preventing water damage is an integral part of constructing a muratura shower niche. By applying a waterproof membrane under tiles, you can protect both the material and structure from water-related harm.
Building Techniques for a Muratura Shower Niche
Material Selection
Various materials are needed to construct a muratura shower niche, including bricks or stone blocks, adhesive, cement, sand, reinforcing steel, and waterproofing coatings. Using high-quality materials ensures durability and longevity. Choosing the right materials requires professional guidance or extensive research on specialized publications.
Site Preparation
Preparation of the construction site is the initial step in building a muratura shower niche. This involves removing existing fixtures, cleaning the surface, and installing a concrete foundation if necessary. If the wall already features plumbing or other components, careful handling to avoid damage during construction is indispensable.
Reinforcing the Structure
Creating an armature—a metal mesh structure—provides support and strength to the muratura shower niche. This process demands specialized skills and equipment. Properly securing the armature to surrounding structures using tight mesh wire ensures a solid foundation for the build.
Applying Reinforcement Layers
Following the installation of the armature, applying a reinforcing layer of cement provides additional stability. A uniform layer is essential across all areas, especially in corners and edges.
Installing Support Elements
Once reinforcement layers are applied, support elements such as concrete blocks or steel beams are added to distribute loads effectively on surrounding structures.
Tiling the Shower Niche
With the structural components in place, tiling can begin. The choice of tile depends on personal preference; however, it must be water-resistant and durable. Options include ceramic tiles, mosaics, or natural stone for the surface layer.
Finishing Touches: Filling Gaps and Sealing
After installation is complete, filling gaps between tiles with a matching material (such as cement mortar) is necessary. After setting the material, excess must be removed using a damp sponge to avoid any water spots or unevenness.
A waterproof sealant applied following the completion of this step protects the niche from future water damage, ensuring long-lasting functionality and aesthetic appeal.
Finitures and Maintenance
Required Materials
To start, ensure you have all necessary materials for application, including tiles, adhesive, a damp sponge, cement, and a sealant.
Applying Tiles to the Shower Niche
The first stage involves attaching tiles or other finishes to the newly completed muratura shower niche. Begin by cleaning the surface of any dirt or debris, then apply the adhesive following manufacturer instructions using a specialized tool (like a notched trowel). After securing each tile, inspect for evenness and apply further adhesive if necessary.
Sealing the Tiles
Following successful attachment, applying a sealant to protect against future water exposure is essential. Be sure to follow manufacturer guidelines for application duration and any recommended maintenance routines.
Regular Cleaning and Maintenance
After installation, regular cleaning with a mild detergent and soft cloth will keep your muratura shower niche looking its best while preventing the buildup of dirt or mineral deposits that can damage tiles or impair their functionality. Regular inspections are also advisable to identify potential issues early on, such as loose tiles or weakened sealants, allowing for prompt repair before serious problems arise.
By following these guidelines and staying informed about local building regulations and materials, you can create a beautiful and functional muratura shower niche that will remain in good condition over time.


