
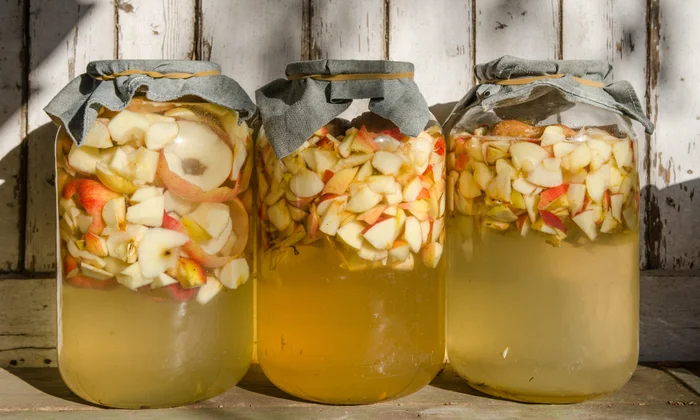
As we navigate the world of natural remedies and home brewing, one topic stands out for its versatility and benefits: apple cider vinegar (ACV). This versatile liquid has been used for centuries not only as a household staple but also as a medicinal remedy. From beauty treatments to digestive issues, ACV is an incredibly valuable product that can be made at home using simple ingredients.
However, many commercial ACVs on the market contain sulfites, preservatives that may alter its quality and effectiveness. But don’t worry; we’ll show you how to make your own apple cider vinegar in the comfort of your own kitchen!
Why Make Your Own Apple Cider Vinegar?
Commercial ACV can be pricey, especially if you’re looking for a high-quality product without sulfites. Additionally, many commercial products are mass-produced and may contain additives that can negate its benefits. By making your own apple cider vinegar at home, you can ensure a consistent supply of this natural remedy, free from artificial preservatives.
The Importance of Using High-Quality Apples
When it comes to making ACV, the quality of your apples is paramount. You’ll want to use only sweet, ripe apples, preferably organic, as they will yield a more potent and flavorful vinegar. Make sure to wash, peel, core, and chop these fruits before proceeding with the fermentation process.
The Basic Process of Making Apple Cider Vinegar at Home
To make your own apple cider vinegar at home, you’ll need the following ingredients:
- Sweet apples
- Water (optional)
- Cheesecloth or a coffee filter
- A clean glass container
Here’s a step-by-step guide to making ACV at home:
Step 1: Prepare the Apples
Wash, peel, core, and chop your sweet apples into small pieces. Place these apple pieces in a large bowl and add enough water to cover them completely.
Step 2: Create the Must
Transfer the apple mixture to a large glass container, making sure to remove as much air as possible. Cover the container with cheesecloth or a coffee filter, securing it with a rubber band.
Step 3: Ferment the Must
Place the container in a warm, dark location (around 68-72°F/20-22°C) and let the mixture ferment for 4-6 weeks, shaking the container daily. This step is crucial as it allows the natural yeast on the apples to convert the sugars into acetic acid.
Step 4: Strain the Vinegar
After fermentation, strain the liquid through a cheesecloth or coffee filter into another clean glass container. Discard the solids and reserve the vinegar.
Step 5: Age the Vinegar (Optional)
For a smoother, more mature flavor, age the vinegar for an additional 3-6 months by storing it in a cool, dark place.
Tips for Making Apple Cider Vinegar at Home
- Use fresh apples for better fermentation
- Keep the container away from direct sunlight and heat sources
- Monitor the pH level of your vinegar (it should be between 2.4 and 3.0)
- Experiment with different apple varieties to find the perfect blend
Common Mistakes to Avoid When Making Apple Cider Vinegar
- Using pasteurized apples: Pasteurization will kill off the natural yeast on the apples, resulting in an ineffective fermentation process.
- Not monitoring pH levels: If your vinegar is too alkaline or acidic, it may affect its effectiveness and flavor.
- Over-fermenting the must: This can lead to an overly strong vinegar that’s difficult to digest.
- Not using enough apples: A lack of apples will result in a weak or under-concentrated vinegar.
Frequently Asked Questions
Q: Can I make apple cider vinegar using other fruits?
A: Yes! Try experimenting with grape juice or berries to create unique flavor profiles.
Q: How often should I take apple cider vinegar for digestive issues?
A: As a general rule, start with 1-2 tablespoons per day and gradually increase as needed. Always consult with a healthcare professional before adding any new supplement to your diet.
Q: Can I make apple cider vinegar in the winter?
A: Yes! Simply adjust the temperature of your fermentation environment accordingly (around 64°F/18°C).
Q: What is the best way to store apple cider vinegar at home?
A: Store it in a cool, dark place away from direct sunlight and heat sources.
Benefits of Apple Cider Vinegar
Apple cider vinegar has been shown to have numerous health benefits, including:
- Improving digestion: ACV can help alleviate symptoms of irritable bowel syndrome (IBS) and other digestive issues.
- Supporting weight loss: The acetic acid in ACV can increase feelings of fullness and boost metabolism.
- Lowering cholesterol levels: Studies have shown that consuming ACV daily can lower LDL (“bad”) cholesterol levels.
- Reducing blood sugar levels: ACV may help regulate blood sugar levels and improve insulin sensitivity.
Conclusion
With these simple steps, you can create a high-quality, sulfite-free apple cider vinegar at home that’s rich in medicinal properties. From digestive issues to beauty treatments, ACV is an incredibly valuable product that deserves your attention. By making your own ACV, you’ll be able to reap its numerous benefits while avoiding artificial preservatives and additives.
Troubleshooting Common Issues
- Mold growth: Check the container for any signs of mold or contamination. If you notice any issues, discard the vinegar and start again.
- Fermentation issues: Monitor your pH levels and adjust the fermentation environment accordingly.
- Vinegar not developing flavor: Experiment with different apple varieties, add more apples to the must, or try aging the vinegar for a longer period.
By following these tips and troubleshooting common issues, you can successfully make your own apple cider vinegar at home and enjoy its numerous benefits without breaking the bank.


