
Optimizing Planting: A Comprehensive Guide to Preparing the Planting Hole
As a gardener, one of the most crucial steps in planting is preparing the right-sized hole for your new plant. This step requires careful planning and attention to detail to ensure the best possible start for your newly potted plant. In this article, we’ll delve into the world of planting holes, exploring the key factors that determine its size, depth, shape, and filling.
Why Prepare a Planting Hole?
Before diving into the specifics, it’s essential to understand why preparing a planting hole is so critical. The process allows the soil to settle and compact, providing a stable foundation for your plant’s root system to develop. Properly prepared soil also ensures that the plant receives adequate oxygen and water, setting it up for success.
The Ideal Planting Hole Size
When it comes to determining the size of the planting hole, there are some general guidelines to follow. According to experts, the hole should be at least twice as wide as the pot your plant is currently in. For example, if you have a 20 cm pot, the planting hole should be around 40 cm wide. This ensures that the soil has enough room to settle and provide adequate support for the roots.
However, it’s not just about following a rule of thumb; the size of the hole also depends on the type of plant you’re growing. For smaller plants with delicate root systems, a wider hole may be necessary to prevent damage during planting. Conversely, larger plants with established root systems may require a more modestly sized hole.
Planting Hole Depth: A Matter of Proportion
Another critical factor in determining the depth of your planting hole is the height of the plant’s crown. The crown refers to the area where the stem meets the roots, and it’s essential to position this zone at soil level to prevent waterlogged conditions. To achieve this, you’ll need to create a hole that’s proportionate to the plant’s size.
A simple way to determine the depth is to use a measuring tape or ruler. Measure from the top of the soil surface down to where the crown will sit, and then add a few centimeters to ensure adequate space for the roots to grow. If necessary, adjust the hole by adding more soil or removing some to achieve the desired depth.
The Shape of Your Planting Hole
While there’s no one “right” shape for your planting hole, research suggests that plants tend to develop healthier root systems when planted in a hole with rounded corners. This is because the curved shape allows the roots to grow outward without getting trapped or constricted.
That being said, there’s no need to get too carried away with creative designs; a simple, flat-sided hole will suffice for most cases. If you’re feeling adventurous, go ahead and try planting in a round hole – just be sure to add some extra soil around the edges to prevent erosion.
Filling the Planting Hole: A Delicate Balance
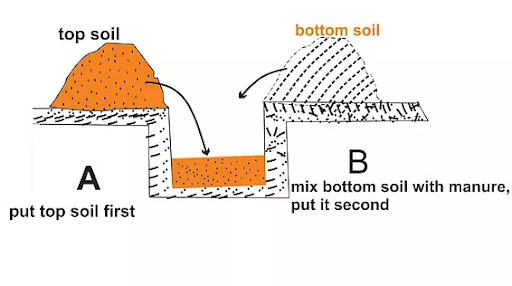
Once you’ve prepared your planting hole, it’s time to fill it with soil. This is where things can get tricky, as you’ll need to strike a balance between retaining moisture and preventing waterlogging. Here are some tips for achieving this delicate balance:
- If your soil tends to retain too much water, consider adding some sand or perlite to improve drainage.
- Conversely, if your soil is too dry, mix in some compost or peat moss to retain moisture.
- For plants with sensitive roots, a thin layer of organic matter like straw or bark chips can help prevent root damage during planting.
Final Touches: Pressing Down and Backfilling
After filling the hole with soil, it’s time for the final touches. Start by pressing down gently on the soil around the base of the plant using your hands or a fork. This helps settle the soil and create a stable foundation for the roots to grow.
Next, fill in any gaps around the edges of the planting hole with additional soil, leaving a small indentation around the base of the stem. This allows water to penetrate the soil more easily and prevents erosion.
Conclusion
Preparing a high-quality planting hole is an essential step in giving your new plant the best possible start. By following these guidelines, you’ll be well on your way to creating a stable foundation for healthy root growth and optimal plant performance.
Frequently Asked Questions
- What’s the minimum size of the planting hole? While there’s no one “right” answer, a general rule of thumb is to create a hole that’s at least twice as wide as the pot your plant is currently in.
- How deep should the planting hole be? The depth of the hole should be proportionate to the height of the plant’s crown, taking into account the space required for root growth and drainage.
- What shape should the planting hole be? While there’s no one “right” answer, research suggests that plants tend to develop healthier root systems when planted in a hole with rounded corners or a flat-sided design.
- How do I achieve the right balance of moisture retention and drainage? To strike this delicate balance, consider adding sand or perlite for dry soils and compost or peat moss for waterlogged soils.
- What’s the best way to fill in gaps around the planting hole? Use additional soil to create a stable foundation, leaving a small indentation around the base of the stem for optimal drainage and erosion prevention.
- How often should I check and adjust my planting hole? Regularly inspect your plant’s root growth and adjust the hole as necessary to ensure optimal performance.
- Can I use different materials for the planting hole, such as peat moss or compost? Yes, but be aware that these materials may affect soil drainage and nutrient availability, so consider factors like waterlogging and nutrient uptake when selecting a material.
By following these guidelines and tips, you’ll be well on your way to creating an optimal planting hole for your new plant.


